```html
DIY Concrete Patio: A Comprehensive Guide
A concrete patio can significantly enhance a property's outdoor living space, offering a durable and versatile platform for relaxation, entertainment, and dining. While professional installation guarantees expertise and efficiency, undertaking a DIY concrete patio project is a feasible option for homeowners willing to invest time, effort, and meticulous planning. This article provides a comprehensive guide to constructing a concrete patio, covering everything from planning and preparation to pouring and finishing the concrete.
Planning and Design
The initial stage of any DIY concrete patio project is meticulous planning. This involves considering the patio's size, shape, location, and intended use. The size of the patio should be proportional to the property and adequate for the desired activities. Consider the placement of furniture, grills, and other features when determining the necessary square footage.
The shape of the patio can range from simple squares and rectangles to more complex curves and angles. The chosen shape should complement the architectural style of the house and the surrounding landscape. Use landscape design software or graph paper to visualize the patio's appearance and ensure it integrates harmoniously with the existing environment.
The location of the patio is another crucial factor. Consider proximity to the house, sunlight exposure, drainage, and any existing utilities. A patio adjacent to the house provides easy access and convenience, while a secluded patio in the yard offers greater privacy. Ensure the location allows for adequate drainage to prevent water accumulation and potential damage. Contact local utility companies to identify and mark the location of any underground utilities before excavation.
Lastly, consider the intended use of the patio. Will it primarily be used for dining, lounging, or entertaining? The intended use will influence the size, shape, and features of the patio. For example, a patio intended for dining will require more space for tables and chairs, while a patio intended for lounging may benefit from built-in seating or a fire pit.
Preparation and Excavation
Once the planning stage is complete, the next step is to prepare the site for the concrete pour. This involves removing existing vegetation, excavating the area, and creating a stable base. First, remove any grass, weeds, rocks, or other debris from the designated area. Use a shovel, spade, or sod cutter to remove the vegetation and expose the underlying soil.
Next, excavate the area to the required depth. The depth of excavation will depend on the desired thickness of the concrete slab and the type of base material used. A typical concrete patio slab is 4 inches thick, and the base material should be at least 4 inches thick. Therefore, excavate the area to a depth of at least 8 inches. Use a shovel and wheelbarrow to remove the excavated soil. Ensure the excavation is level and uniform to provide a consistent base for the concrete.
After excavation, compact the soil using a hand tamper or a plate compactor. Compacting the soil will create a stable base and prevent settling after the concrete is poured. Pay particular attention to the edges and corners of the excavation, where the soil is more likely to be less compacted. Grade the soil to ensure proper drainage away from the house and surrounding structures. A slight slope of approximately 1/4 inch per foot is recommended.
Once the soil is compacted and graded, add a layer of base material, such as crushed gravel or crushed stone. The base material provides additional drainage and stability for the concrete slab. Spread the base material evenly over the excavated area to a depth of at least 4 inches. Use a rake to distribute the material and ensure it is level. Compact the base material using a hand tamper or a plate compactor. This will create a solid, stable base for the concrete pour.
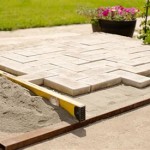
Install forms around the perimeter of the excavation to contain the concrete. The forms should be made of sturdy material, such as lumber or plywood, and should be securely fastened together. Ensure the forms are level and aligned to create a smooth, even surface for the concrete. Use stakes to support the forms and prevent them from shifting during the concrete pour. The top of the forms should be at the desired height of the finished concrete slab.
Pouring and Finishing the Concrete
With the site prepared and the forms in place, the next step is to pour and finish the concrete. Before pouring the concrete, wet the base material to prevent it from absorbing moisture from the concrete mix. This will help ensure proper hydration and strength development of the concrete.
Mix the concrete according to the manufacturer's instructions. Concrete can be mixed by hand in a wheelbarrow or with a concrete mixer. A concrete mixer is recommended for larger projects, as it provides a more consistent and thorough mix. Use the correct proportions of cement, sand, gravel, and water to achieve the desired consistency. The concrete should be wet enough to be workable but not so wet that it is runny.
Pour the concrete into the forms, starting at one end and working your way to the other. Use a shovel to distribute the concrete evenly and avoid creating air pockets. Overfill the forms slightly to allow for consolidation and finishing.
Once the concrete is poured, consolidate it using a concrete vibrator. A concrete vibrator removes air pockets and ensures the concrete settles properly within the forms. Insert the vibrator into the concrete at regular intervals, being careful not to over-vibrate, which can cause segregation of the mix.
After consolidation, screed the concrete to level the surface. A screed is a long, straight board used to level the concrete to the top of the forms. Place the screed on top of the forms and move it back and forth in a sawing motion to remove excess concrete and create a smooth, even surface. Use a bull float to further smooth the surface and remove any imperfections left by the screed. The bull float is a large, flat tool with a long handle that is used to smooth the concrete from a distance.
Allow the concrete to bleed, which is the process of water rising to the surface. Once the bleed water has evaporated, begin the finishing process. This typically takes a few hours, depending on the weather conditions. Use a hand float to create a smooth, dense surface. The hand float is a smaller, rectangular tool used to refine the surface and remove any remaining imperfections.
After floating, edge the concrete to create a rounded or beveled edge. An edger is a tool used to create a smooth, rounded edge along the perimeter of the patio. This prevents chipping and cracking and gives the patio a more finished appearance. Use a groover to create control joints in the concrete. Control joints are shallow cuts in the concrete that allow it to expand and contract without cracking. Space the control joints approximately 8 to 10 feet apart.
Finally, apply a finish to the concrete to create a desired texture. There are various finishing techniques, including brushing, swirling, stamping, and exposed aggregate. A brushed finish provides a slip-resistant surface, while a swirled finish adds visual interest. Stamped concrete mimics the look of natural stone or brick, and exposed aggregate exposes the decorative stones within the concrete mix. Choose a finish that complements the architectural style of the house and the surrounding landscape.
Cure the concrete properly to ensure it achieves its full strength and durability. Curing involves keeping the concrete moist for several days after it is poured. This can be achieved by covering the concrete with plastic sheeting, burlap, or a curing compound. Keep the concrete moist for at least seven days, or longer in hot, dry weather. Proper curing is essential for preventing cracking and ensuring the long-term performance of the concrete patio.
```
Diy Concrete Patio In 8 Easy Steps How To Pour A Cement Slab

Diy Concrete Patio How To Pour A Slab Bob Vila

How To Make A Nice Cement Patio Diy Concrete

Diy Concrete Patio How To Pour A Slab Bob Vila

Pouring Concrete Patio What Could Go Wrong With Doing It Yourself

How To Plan Pour Your Diy Concrete Patio Liberty Ready Mix

How To Install A Diy Concrete Patio

Resurfacing A Concrete Patio For Budget Diy Makeover Fab Everyday

Diy Concrete Patio How To Pour Your Own Slab Bn S

Diy Concrete Patio Makeover The Frugal South