Sun Shade Sail Patio Ideas: DIY Plans for Cool Outdoor Comfort
Creating a comfortable and stylish outdoor space is a common goal for homeowners. A patio serves as an extension of the living area, providing a space for relaxation, entertainment, and enjoying the natural surroundings. However, excessive sun exposure can limit the usability of a patio, making it uncomfortable during peak hours. Sun shade sails offer a practical and aesthetically pleasing solution to this problem. They provide shade, enhance the visual appeal of the patio, and can be customized to suit various design preferences and spatial constraints. This article will explore DIY plans for sun shade sails, covering design considerations, material selection, installation techniques, and maintenance tips.
Understanding the Benefits of Sun Shade Sails
Sun shade sails are tensile structures designed to provide shade and protection from the sun's harmful UV rays. Unlike traditional awnings or patio umbrellas, shade sails offer a more dynamic and architecturally interesting solution. These sails are typically made from durable, UV-resistant fabric stretched between multiple anchor points. They can be configured in various shapes and sizes to create customized shade patterns and visual effects. The benefits of using sun shade sails for patio shade include:
Effective Sun Protection: High-quality shade sail fabrics block a significant percentage of UV rays, reducing the risk of sunburn and skin damage. This makes the patio a safer and more comfortable space for extended outdoor use.
Temperature Regulation: By blocking direct sunlight, shade sails help to lower the temperature of the patio area. This can reduce the need for air conditioning and create a more pleasant outdoor environment.
Design Versatility: Shade sails are available in a wide range of colors, shapes, and sizes, allowing for creative design options. They can be combined in multiple configurations to create unique patterns and shade coverage.
Cost-Effectiveness: Compared to permanent structures like pergolas or gazebos, shade sails are a more affordable shade solution. DIY installation can further reduce costs.
Ease of Installation and Removal: Shade sails can be relatively easy to install, especially with proper planning and preparation. They can also be easily removed and stored during the off-season or in anticipation of severe weather conditions.
Enhanced Aesthetics: Shade sails can significantly enhance the visual appeal of a patio, adding a modern and stylish touch to the outdoor space. The flowing lines and dynamic shapes of the sails create a visually striking focal point.
Planning Your DIY Sun Shade Sail Project
Before embarking on a DIY sun shade sail project, careful planning is essential to ensure a successful outcome. This involves assessing the patio area, determining shade requirements, selecting appropriate materials, and developing a detailed installation plan. Key steps in the planning process include:
Assessing the Patio Area: Measure the dimensions of the patio area and identify potential anchor points. Consider the direction of the sun's path and the desired shade coverage throughout the day. Note any existing structures, trees, or other obstacles that may affect the shade sail design or installation.
Determining Shade Requirements: Decide on the level of shade coverage desired for the patio. Consider the time of day when the patio is most frequently used and the amount of sun exposure during those times. Adjust the size and shape of the shade sail accordingly.
Selecting the Right Shade Sail Fabric: Choose a shade sail fabric that is durable, UV-resistant, and appropriate for the climate. Common fabric options include high-density polyethylene (HDPE) and knitted polyethylene fabrics. HDPE fabrics are known for their strength, durability, and UV resistance, while knitted fabrics offer better breathability and flexibility. Consider the color of the fabric, as darker colors tend to provide more shade but may also absorb more heat. Lighter colors reflect more sunlight but may not provide as much shade.
Choosing Anchor Points and Hardware: Select suitable anchor points for the shade sail. These can include existing structures such as house walls, posts, or trees. If necessary, install new posts specifically for the shade sail. Choose high-quality hardware such as turnbuckles, shackles, and pad eyes to ensure the shade sail is securely attached and properly tensioned. Stainless steel hardware is recommended for its durability and resistance to corrosion.
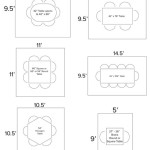
Creating a Detailed Installation Plan: Develop a detailed plan that outlines the steps involved in installing the shade sail. This should include measurements, anchor point locations, hardware requirements, and tensioning procedures. Consider creating a scale drawing or using design software to visualize the final result. Ensure that the plan complies with any local building codes or regulations.
DIY Sun Shade Sail Installation: A Step-by-Step Guide
Once the planning phase is complete, the next step is to install the sun shade sail. This process involves attaching the shade sail to the selected anchor points, tensioning the fabric, and making any necessary adjustments. The following is a step-by-step guide to DIY sun shade sail installation:
Installing Anchor Points: If new posts are required, install them securely in the ground. Use concrete to set the posts and ensure they are plumb and level. Allow the concrete to cure completely before proceeding. For wall-mounted anchor points, use appropriate hardware such as lag bolts or expansion anchors to securely attach pad eyes to the wall. Ensure that the anchor points are strong enough to withstand the tension of the shade sail.
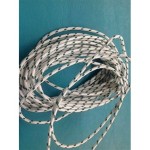
Attaching Hardware: Attach turnbuckles, shackles, and rope (if needed) to the anchor points. Turnbuckles allow for adjusting the tension of the shade sail, while shackles connect the shade sail corners to the turnbuckles. Use rope or cable to extend the distance between the shade sail corners and the anchor points if necessary.
Connecting the Shade Sail: Attach the corners of the shade sail to the shackles. Begin by loosely connecting all corners to ensure the shade sail is properly positioned. Adjust the turnbuckles to gradually tension the fabric. Work your way around the shade sail, tightening each turnbuckle a little at a time to distribute the tension evenly.
Tensioning the Shade Sail: Once all corners are connected, continue to tighten the turnbuckles until the shade sail is taut and wrinkle-free. The amount of tension required will depend on the size and shape of the shade sail, as well as the fabric type. Be careful not to over-tension the fabric, as this can damage the shade sail or the anchor points. Monitor the tension of the shade sail regularly, especially during the first few days after installation, and make any necessary adjustments.
Making Adjustments: After the shade sail is installed, observe the shade pattern throughout the day and make any necessary adjustments. If the shade coverage is not optimal, adjust the position or tension of the shade sail. Consider adding or removing hardware to fine-tune the installation. Ensure that the shade sail is properly secured and that there are no loose or dangling components.
Safety Precautions: While installing the shade sail, ensure that you are using appropriate safety equipment such as safety glasses and gloves. Use a ladder safely and have assistant hold the ladder. If the post requires digging, contact local utility companies to locate any underground utilities.
Design Inspirations for Sun Shade Sail Patios
Sun shade sails offer a wide range of design possibilities, allowing homeowners to create unique and visually appealing outdoor spaces. Some design inspirations for sun shade sail patios include:
Triangular Sails: Triangular shade sails are a popular choice for creating a modern and minimalist look. They can be arranged in overlapping patterns or used individually to create a dynamic shade pattern.
Square or Rectangular Sails: Square or rectangular shade sails provide a more traditional and structured look. They are well-suited for covering larger patio areas and can be combined to create a solid shade canopy.
Overlapping Sails: Overlapping multiple shade sails of different shapes and sizes creates a layered and visually interesting effect. This can also provide more complete shade coverage and protection from the elements.
Colorful Sails: Choose shade sails in vibrant colors to add a pop of color to the patio area. Consider coordinating the colors of the shade sails with the existing patio furniture and landscaping.
Curved Sails: Curved shade sails offer a more organic and flowing look. They can be used to create a soft and inviting outdoor space.
Combination of Sails and Plants: Integrate shade sails with climbing plants such as vines or wisteria to create a natural and integrated shade structure. This can add a touch of greenery and create a more secluded patio area.
Illuminated Sails: Incorporate outdoor lighting into the shade sail design to create a warm and inviting ambiance in the evening. String lights, spotlights, or LED strips can be used to illuminate the shade sails and highlight their unique shape and texture.
Maintaining Your Sun Shade Sail for Longevity
Proper maintenance is essential to ensure the longevity and performance of sun shade sails. Regular cleaning, inspection, and care can help to prevent damage and extend the lifespan of the shade sails. Some maintenance tips include:
Regular Cleaning: Clean the shade sails regularly to remove dirt, dust, and debris. Use a soft brush, mild detergent, and water to gently scrub the fabric. Avoid using harsh chemicals or abrasive cleaners, as these can damage the fabric.
Inspecting for Damage: Inspect the shade sails regularly for any signs of damage, such as tears, rips, or frayed edges. Repair any damage promptly to prevent it from worsening. Use a needle and thread or a patch kit to repair small tears. Consult a professional for more extensive repairs.
Adjusting Tension: Periodically check the tension of the shade sails and adjust the turnbuckles as needed. Over time, the fabric may stretch or loosen, requiring adjustments to maintain proper tension.
Storing During Off-Season: Remove the shade sails during the off-season or in anticipation of severe weather conditions. Store the shade sails in a dry and protected location to prevent damage from moisture, mildew, or pests.
Protecting from Severe Weather: Take down the shade sails during high winds, heavy rain, or snow. These conditions can put excessive stress on the shade sails and anchor points, potentially causing damage.
UV Protection: While quality sails are UV resistant, consider applying a UV protectant spray periodically to protect the fabric from the harmful effects of the sun. This can help to prolong the life of the fabric and prevent fading.

12 Beautiful Shade Structures Patio Cover Ideas A Piece Of Rainbow

12 Beautiful Shade Structures Patio Cover Ideas A Piece Of Rainbow

Patio Shade How To My Outdoor Living Tips

8 Steps For Creating The Perfect Shade Sail

Sun Shade Install With Lights Backyard Transformation On A Budget

12 Beautiful Shade Structures Patio Cover Ideas A Piece Of Rainbow

11 Excellent Backyard Patio Shade Ideas To Upgrade Your Space Structureworks
.png?strip=all "8 Steps For Creating The Perfect Shade Sail")
8 Steps For Creating The Perfect Shade Sail

Shade Sails An Easy Diy Guide To Installing Your Own Patio Shades Reviewed

Deck Shade Ideas To Give You Relief This Summer
Related Posts