How To Replace Sliding Patio Door Rollers
Sliding patio doors offer a convenient way to access outdoor spaces, bringing natural light and ventilation into a home. However, one common issue that arises with these doors is the degradation of the rollers, leading to difficulty in opening and closing. Replacing the rollers is a manageable task for homeowners with basic tools and a methodical approach. This article provides a comprehensive guide on how to replace sliding patio door rollers, covering the necessary tools, step-by-step instructions, and essential considerations.
Before commencing the replacement process, it is imperative to accurately diagnose the problem. Difficulty in sliding the door is a primary indicator of worn or damaged rollers. This resistance might manifest as requiring excessive force to move the door, jerky movements, or a scraping sound emanating from the bottom track. A visual inspection of the rollers can often confirm the issue. Look for visible wear and tear, cracks, flat spots, or accumulated debris obstructing their movement. If the rollers appear significantly damaged or are not rotating freely, replacement is generally the most effective solution.
Preparing for the Replacement: Tools and Materials
Successful replacement hinges on having the correct tools and materials readily available. Gather the following items before starting the project:
- New Rollers: This is the most crucial component. Identifying the correct replacement rollers is paramount. Typically, the existing rollers will have a manufacturer's mark or part number stamped on them. If not, carefully measure the diameter, width, and mounting style of the old rollers. Take detailed photographs to compare with available options at hardware stores or online retailers. Ensure the new rollers are compatible with the door's track and weight capacity. Using the wrong rollers can lead to continued operational problems and potential damage to the door or frame.
- Screwdriver Set: A variety of screwdrivers, including both Phillips head and flathead, are essential. The specific types and sizes needed will depend on the fasteners used to secure the door and the roller assemblies.
- Putty Knife or Flat Pry Bar: These tools are used to carefully pry the door from the frame. Employ caution to avoid damaging the door or frame during this process.
- Adjustable Wrench or Socket Set: These tools are used to loosen and tighten the screws or bolts that hold the roller assemblies in place.
- Hammer: A hammer might be necessary to gently tap the putty knife or pry bar for leverage. Avoid excessive force, as this could cause damage.
- Safety Glasses: Eye protection is crucial to prevent debris from entering the eyes during the replacement process.
- Gloves: Gloves provide a better grip and protect hands from dirt, grease, and potential sharp edges.
- Cleaning Supplies: A brush, vacuum cleaner, and cleaning solution will be needed to clean the track and surrounding area after removing the old rollers. A clean track ensures smooth operation of the new rollers.
- WD-40 or Lubricant: Applying lubricant to the new rollers and the track can further enhance smooth operation.
- Measuring Tape: Accurate measurements are needed to ensure proper alignment of the new rollers.
Step-by-Step Roller Replacement Procedure
Following these steps will lead to a successful roller replacement:
- Prepare the Workspace: Clear the area around the patio door, providing ample space to work. Protect the surrounding floor with a drop cloth to prevent scratches or damage.
- Remove the Sliding Door: This step requires careful execution to avoid injury or damage to the door. Most sliding patio doors have a system for lifting and tilting the door out of the track.
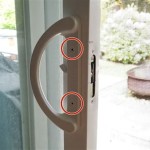
- Locate adjustment screws at the bottom of the door, usually near the rollers.
- Loosen these screws to lower the rollers, creating clearance for lifting the door. Turning the screws counter-clockwise typically lowers the rollers.
- Grasp the door firmly at the top and bottom.
- Lift the door slightly, enough to clear the bottom track.
- Tilt the top of the door inwards, away from the frame.
- Carefully lower the door out of the top track.
- Set the door down gently on a protected surface. Ensure the door is stable and will not fall over.
- Access and Remove the Old Rollers: With the door removed, the roller assemblies are now accessible.
- Locate the roller assemblies at the bottom of the door. These are typically housed within a metal or plastic casing.
- Remove the screws or bolts securing the roller assemblies to the door frame. Note the orientation of the assemblies before removing them; this will aid in installing the new rollers correctly.
- Once the fasteners are removed, carefully extract the old roller assemblies.
- Install the New Rollers: Installing the new rollers is essentially the reverse of the removal process.
- Insert the new roller assemblies into the designated slots or housings.
- Align the assemblies according to the orientation noted during the removal process.
- Secure the assemblies using the screws or bolts that were previously removed. Tighten the fasteners securely, but avoid over-tightening, which could damage the door frame or the roller assembly.
- Ensure the new rollers rotate freely within their housings.
- Clean the Track: Before reinstalling the door, thoroughly clean the bottom track.
- Use a brush or vacuum cleaner to remove any accumulated dirt, debris, or old lubricant.
- Wipe the track with a cleaning solution to remove any remaining residue.
- Ensure the track is completely dry before proceeding.
- Consider applying a small amount of lubricant to the track to facilitate smooth operation of the new rollers.
- Reinstall the Sliding Door: Reinstalling the door requires careful attention to ensure it sits properly within the tracks.
- Lift the door and tilt the top inwards, engaging it in the top track first.
- Carefully lower the door until the bottom rollers align with the bottom track.
- Ensure the door sits flush against the frame.
- Adjust the Rollers: Once the door is reinstalled, adjust the rollers to achieve proper alignment and smooth operation.
- Locate the adjustment screws at the bottom of the door.
- Adjust the screws to raise or lower the rollers until the door slides freely and evenly.
- Turning the screws clockwise typically raises the rollers, while turning them counter-clockwise lowers them.
- Test the door's movement after each adjustment, making small increments until the desired result is achieved.
- Ensure the door closes tightly and seals properly against the weather stripping.
Troubleshooting Common Problems
Even with careful execution, certain problems may arise during or after the roller replacement process. Recognizing and addressing these issues promptly can ensure a successful outcome.
- Door is Still Difficult to Slide: This could indicate several issues. Verify that the rollers are properly adjusted and that they are making full contact with the track. Inspect the track for any obstructions or damage that might be hindering the door's movement. Ensure the new rollers are the correct size and type for the door. If the problem persists, the door frame may be warped or misaligned, requiring professional attention.
- Screws are Stripped: Stripped screws can occur during the removal or installation process. Attempt to use a rubber band or steel wool between the screwdriver and the screw head to gain a better grip. If this fails, consider using a screw extractor tool. In severe cases, it might be necessary to drill out the stripped screw and replace it with a new one of the same size and type.
- Door Is Not Level: If the door is not level, it may bind against the frame, making it difficult to slide. Use a level to check the door's alignment. Adjust the rollers until the door is perfectly level. If leveling the door does not resolve the issue, the frame itself may be out of plumb, again needing professional attention.
- Rollers Are Making Noise: Some noise is normal initially as the new rollers break in. However, excessive noise could indicate that the rollers are not properly lubricated or that there is debris in the track. Clean and lubricate the rollers and track. If the noise persists, inspect the rollers for any damage or defects.
- The Door Is Too Heavy to Lift: Large or heavily glazed patio doors can be substantial. Seek assistance from another person to safely lift and maneuver the door. Attempting to handle a heavy door alone can lead to injury or damage to the door or frame.
Replacing sliding patio door rollers is a straightforward task that can significantly improve the functionality and ease of use of a patio door. By adhering to these clearly presented steps and taking the time to properly prepare and troubleshoot, homeowners can successfully complete this project and enjoy a smoothly operating patio door.

How To Replace Sliding Glass Door Rollers Diy Guide

How To Identify Patio Door Rollers

Replacing Your Sliding Glass Door Rollers Window Repair Man

How To Replace The Rollers In An Andersen Gliding Door

How To Repair Or Replace Sliding Glass Door Rollers Dengarden

How To Repair Or Replace Sliding Glass Door Rollers Dengarden

How To Replace The Rollers On A Premium Wood Sliding Patio Door

Replacing Your Sliding Glass Door Rollers Window Repair Man

Adjusting And Replacing Sliding Patio Door Rollers

How To Replace The Rollers On A Upvc Sliding Patio Door