```html
How To Replace Rollers On a Sliding Patio Door
A sliding patio door can offer a seamless transition between indoor and outdoor living spaces. However, over time, the rollers that allow the door to glide along its track can wear down, leading to difficulty in opening and closing the door. Replacing these rollers is a manageable task for a homeowner with basic tools and a willingness to follow instructions. This article provides a comprehensive guide to replacing rollers on a sliding patio door, ensuring a smooth and functional doorway.
Identifying the Problem and Gathering Supplies
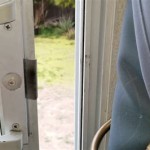
Before commencing the roller replacement process, it is crucial to accurately diagnose the issue. Common indicators of worn or damaged rollers include a door that is difficult to slide, a grinding or scraping noise during operation, and a door that appears to be sitting unevenly within the frame. Examining the rollers themselves may reveal visible signs of wear, such as flat spots, cracks, or excessive debris buildup.
Once the problem is confirmed, gather the necessary tools and materials. Essential tools include: a flathead screwdriver, a Phillips head screwdriver (potentially), a putty knife or scraper, a measuring tape, a set of replacement rollers (matching the existing ones), safety glasses, and gloves. It is highly recommended to have a helper available, as lifting and maneuvering the door can be cumbersome and potentially hazardous for a single person.
The most critical step is selecting the correct replacement rollers. The old rollers must be removed and carefully examined. Ideally, bring one of the old rollers to a hardware store to directly compare it with available replacements. Key measurements to consider include the roller diameter, the width of the wheel, the overall length of the roller assembly, and the type of mounting mechanism (screw-in, clip-in, etc.). Documenting the make and model of the patio door can also aid in finding compatible rollers, especially if the original manufacturer is known. Failure to select the right rollers can lead to improper fit, continued operational problems, and even damage to the door or track.
Removing the Sliding Door
The first step in physically replacing the rollers is to remove the sliding door from its track. This process generally involves two main techniques, depending on the door's design. The first technique involves lifting the door upwards and tilting the bottom out of the track. The second technique involves adjusting height adjustment screws to lower the door enough to clear the track.
To lift and tilt, start by positioning the door halfway open. Carefully lift the door upwards, typically an inch or two, to disengage the bottom rollers from the track. While lifting, tilt the bottom of the door outwards, away from the frame. Once the bottom clears the track, carefully lower the door and lean it against a wall or other stable surface. Ensure the door is placed on a soft surface like a blanket or cardboard to prevent scratches or damage to the frame.
For doors with height adjustment screws, locate these screws at the bottom of the door, usually near the rollers. Use a flathead screwdriver to turn the screws counterclockwise. This action retracts the rollers and lowers the door. Continue turning the screws until the door is low enough to clear the top track. Once the top clears, carefully pull the bottom of the door outwards and remove it from the frame, as described in the previous method. It's important to note the position of these adjustment screws to make reinstallation easier.
Safety is paramount during this step. The door can be heavy and awkward, so having a helper is strongly advised. Wear gloves to protect your hands and safety glasses to prevent debris from entering your eyes. Avoid placing yourself in a position where the door could fall on you.
Replacing the Old Rollers with New Ones
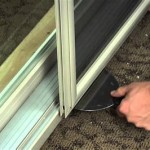
With the door removed and placed on a protected surface, the next step is to access and replace the rollers. The method for accessing the rollers varies depending on the door's construction. In some cases, there will be an access panel or cover located at the bottom of the door frame. This panel is typically secured with screws or clips. Use the appropriate screwdriver or tool to remove the panel and expose the rollers.
In other cases, the rollers may be directly accessible without removing a panel. They might be held in place by screws or clips. Carefully examine the roller assembly to identify the method of attachment. If screws are present, use the appropriate screwdriver to remove them. If clips are used, gently pry them open with a flathead screwdriver or putty knife. Exercise caution to avoid damaging the door frame or the roller assembly.
Once the old rollers are detached, carefully remove them from their housings. Clean the housing area with a brush or cloth to remove any accumulated dirt, debris, or corrosion. This will ensure a smooth and proper fit for the new rollers. Insert the new rollers into the housings, ensuring they are properly aligned and seated. Secure the new rollers in place using the same method that was used to secure the old rollers (screws or clips). Tighten the screws securely, but avoid over-tightening, which could damage the door frame or the rollers themselves.
After replacing the rollers, test their functionality by manually spinning them. They should rotate freely and smoothly. If they do not, double-check the installation to ensure they are properly aligned and secured. Address any issues before reinstalling the door in the track.
Repeat this process for all the rollers on the door. Some doors may have two rollers at the bottom and two at the top, while others may have a different configuration. Ensure all rollers are replaced to ensure smooth and balanced operation of the door.
Reinstalling the Sliding Door and Making Adjustments
With the new rollers installed, the final step is to reinstall the sliding door and make any necessary adjustments. This process is essentially the reverse of the removal process. For doors that were lifted and tilted to remove, carefully lift the door and tilt the bottom back into the track. Ensure the rollers engage properly with the track. Once the bottom is in place, lower the door until the top rollers engage with the top track.
For doors with height adjustment screws, carefully position the bottom of the door into the track. Then, lift the door enough to engage the top track. Once the door is in place, use a flathead screwdriver to turn the height adjustment screws clockwise. This action extends the rollers and raises the door. Adjust the screws until the door glides smoothly and evenly along the track. Make small adjustments to each screw, ensuring the door remains balanced and does not bind at any point.
After reinstalling the door, test its operation thoroughly. Slide the door open and closed several times, observing its movement. If the door is still difficult to slide, or if it binds at any point, further adjustments may be necessary. Recheck the height adjustment screws and ensure they are properly adjusted. If the problem persists, examine the track for any obstructions or damage. Clean the track with a brush or vacuum cleaner to remove any debris. If the track is damaged, it may need to be repaired or replaced.
Lubricating the track can also improve the door's sliding performance. Use a silicone-based lubricant specifically designed for sliding doors. Avoid using oil-based lubricants, as they can attract dust and debris, which can further hinder the door's operation. Apply a small amount of lubricant to the track and distribute it evenly by sliding the door back and forth several times.
Regular maintenance can help prevent future problems with the sliding door. Periodically clean the track and rollers to remove any accumulated dirt and debris. Lubricate the track as needed to maintain smooth operation. Inspect the rollers regularly for signs of wear or damage. Replacing worn or damaged rollers promptly can prevent more serious problems from developing.
```
How To Replace Sliding Glass Door Rollers Doctor

Replacing Your Sliding Glass Door Rollers Window Repair Man

Sliding Door Repair Track Glass Roller Weatherstrip

How To Replace Rollers In Aluminum Sliding Glass Doors

How To Replace Rollers In Aluminum Sliding Glass Doors

Replacing Patio Door Rollers Like A Pro Quick And Easy Tutorial

Replacing Your Sliding Glass Door Rollers Window Repair Man

How To Change The Rollers In Your Vinyl Sliding Patio Door

How To Maintain A Sliding Glass Door Swisco Com

Replacing A Roller For Pella Sliding Door Swisco Com