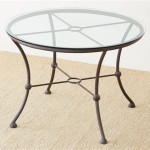
How To Replace a Glass Patio Table Top With Tile
Replacing a glass patio table top with tile can significantly enhance its appearance and durability. While glass offers transparency and a sleek look, it is prone to scratching, shattering, and weathering. Tile, on the other hand, presents a wider range of aesthetic options, increased resistance to the elements, and potentially longer lifespan. This article provides a comprehensive guide to replacing a glass patio table top with tile, covering the necessary materials, tools, and step-by-step instructions.
Assessing the Existing Table and Planning the Tiling Project
Before beginning the project, a thorough assessment of the existing patio table is crucial. This involves evaluating the table's frame, measuring the dimensions of the original glass top, and deciding on the type and style of tile to be used. Inspect the table frame for any signs of rust, corrosion, or structural weakness. Repair or reinforce the frame as necessary to ensure it can support the weight of the tile.
Measuring the original glass top provides the dimensions for the new tiled surface. Note the length, width, and thickness of the glass. This information will be essential when cutting the backer board and determining the amount of tile needed. Consider adding a slight overhang if desired, but ensure it does not compromise the table's stability.
Selecting the appropriate type of tile is paramount. Options include ceramic, porcelain, slate, or even mosaic tiles. Ceramic tiles are generally more affordable and easier to cut, while porcelain tiles offer greater water resistance and durability, making them suitable for outdoor applications. Slate provides a natural stone look but may require sealing to prevent staining. Mosaic tiles allow for intricate designs and patterns, but they can be more time-consuming to install. Consider the climate, aesthetic preferences, and budget when making this decision.
Calculating the amount of tile needed involves determining the surface area of the table top and dividing it by the area of a single tile. Add an extra 10-15% to account for cuts, breakage, and future repairs. Similarly, estimate the amount of backer board, thin-set mortar, grout, and sealant required. It is always advisable to purchase slightly more than estimated to avoid running out of materials mid-project.
Gathering Materials and Tools
A successful tiling project relies on having the right materials and tools at hand. The following list outlines the necessary items for replacing a glass patio table top with tile:
*Backer Board:
Cement backer board or tile backer board provides a stable and water-resistant substrate for the tile. *Tile:
The chosen tile type, sufficient to cover the table top with extra for cuts and repairs. *Thin-Set Mortar:
A bonding agent that adheres the tile to the backer board. Choose a mortar specifically designed for outdoor use. *Grout:
Fills the spaces between the tiles, providing a finished look and preventing water penetration. Select a grout suitable for outdoor use and consider its color in relation to the tile. *Tile Sealer:
Protects the grout from stains and water damage. *Caulk (Optional):
Used to seal the edges of the tiled surface where it meets the table frame, providing a watertight barrier. *Safety Glasses:
Essential for protecting the eyes from dust and debris. *Work Gloves:
Protect the hands from sharp edges and chemicals. *Measuring Tape:
For accurate measurements of the table top and tile. *Pencil or Marker:
For marking cut lines on the backer board and tile. *Square:
Ensures accurate right angles when cutting the backer board and tile. *Tile Cutter:
A manual or electric tile cutter for making precise cuts. *Notched Trowel:
Spreads the thin-set mortar evenly on the backer board. The notch size depends on the size and type of tile used. *Rubber Grout Float:
Applies the grout to the tile surface and pushes it into the joints. *Grout Sponge:
Cleans excess grout from the tile surface. *Buckets:
For mixing mortar and grout. *Clean Cloths:
For wiping down the tile surface. *Sander or Grinder (Optional):
For smoothing rough edges on the tile or backer board. *Drill with Screws (Optional):
For securing the backer board to the table frame using screws. *Construction Adhesive (Optional):
Use to adhere backer board if screws are not preferred.Step-by-Step Instructions for Tiling the Patio Table Top
This section provides detailed instructions on how to replace a glass patio table top with tile. Following these steps carefully will ensure a professional-looking and durable result.
Step 1: Preparing the Backer Board
Cut the backer board to the exact dimensions of the original glass top using a utility knife or circular saw with a concrete blade. Multiple passes with a utility knife may be required for thicker boards. Ensure the edges are straight and smooth. If necessary, sand or grind any rough edges.
Depending on the table frame's construction, the backer board can be attached in several ways. If the frame has a lip or support structure, the backer board may simply rest inside it. If the frame is open, secure the backer board with construction adhesive along with screws drilled through the frame into the backer board. Ensure the screws are countersunk to prevent them from interfering with the tile installation. Apply the construction adhesive evenly and press the backer board firmly against the frame. Allow the adhesive to dry completely according to the manufacturer's instructions. Screws should be spaced every 6-8 inches.
Step 2: Laying Out the Tile
Before applying the mortar, dry-lay the tiles on the backer board to plan the layout and ensure a proper fit. Start by placing whole tiles in the center and working outwards. This helps avoid small, awkward cuts along the edges. Use tile spacers to maintain consistent grout lines. If necessary, make adjustments to the layout to minimize the number of cut tiles. Mark the cut lines on the tiles using a pencil or marker.
Step 3: Cutting the Tile
Use a tile cutter to make the necessary cuts. A manual tile cutter is suitable for straight cuts, while an electric tile cutter is recommended for more complex shapes and curves. Follow the manufacturer's instructions for operating the tile cutter. Apply even pressure and score the tile along the marked line. Then, snap the tile along the score line. For curved cuts, use a wet saw or tile nippers.
After cutting, smooth any rough edges with a tile nipper or grinder. Wear safety glasses and gloves during this process. Take care when handling cut tiles, as they can be sharp.
Step 4: Applying the Thin-Set Mortar
Mix the thin-set mortar according to the manufacturer's instructions. Add water gradually until the mortar reaches a smooth, peanut-butter-like consistency. Avoid adding too much water, as this can weaken the mortar. Let the mortar slake for the recommended time, then remix before applying.
Using a notched trowel, apply a thin, even layer of mortar to the backer board. Hold the trowel at a 45-degree angle and create ridges in the mortar. The notch size should be appropriate for the size and type of tile. For larger tiles, use a trowel with larger notches. Only apply mortar to a small area at a time, as the mortar can dry quickly.
Step 5: Setting the Tile
Place the tiles onto the mortar, pressing down firmly and twisting slightly to ensure good adhesion. Use tile spacers to maintain consistent grout lines. Remove any excess mortar from the tile surface with a damp sponge. As you lay the tiles, use a level to ensure the surface is even. Make adjustments as needed by adding or removing mortar. Continue setting the tiles until the entire surface is covered. Allow the mortar to dry completely according to the manufacturer's instructions, typically 24-48 hours.
Step 6: Applying the Grout
Mix the grout according to the manufacturer's instructions. Add water gradually until the grout reaches a smooth, creamy consistency. Avoid adding too much water, as this can weaken the grout. Apply the grout to the tile surface using a rubber grout float. Hold the float at a 45-degree angle and spread the grout diagonally across the tile, forcing it into the grout lines. Remove any excess grout from the tile surface with the grout float.
Allow the grout to set for the recommended time, typically 15-30 minutes. Then, use a damp grout sponge to clean the excess grout from the tile surface. Rinse the sponge frequently and wring it out thoroughly. Wipe the tile surface in a circular motion to remove the grout haze. Repeat this process until the tile surface is clean.
Step 7: Sealing the Grout and Tile (Optional)
After the grout has cured completely, typically 72 hours, apply a grout sealer to protect it from stains and water damage. Follow the manufacturer's instructions for applying the sealer. Some tiles may also benefit from sealing, particularly porous tiles like slate. Apply the sealer evenly and allow it to dry completely.
Step 8: Caulking the Edges (Optional)
If desired, caulk the edges of the tiled surface where it meets the table frame. This will create a watertight barrier and prevent water from seeping underneath the tile. Apply a bead of caulk along the edge and smooth it with a caulk smoothing tool or your finger. Remove any excess caulk with a damp cloth.
Step 9: Final Cleaning and Inspection
After the grout sealer and caulk (if used) have dried completely, give the tiled surface a final cleaning. Use a mild detergent and water to remove any remaining grout haze or residue. Inspect the surface for any imperfections and make any necessary repairs. The newly tiled patio table top is now ready for use.

Diy Replace Glass Tabletop With Tile Weekend Warrior Wednesday Your Modern Family

Diy Replace Glass Tabletop With Tile Weekend Warrior Wednesday Your Modern Family Outdoor Table Tops Top Patio

Diy Replace Glass Tabletop With Tile Weekend Warrior Wednesday Your Modern Family

Diy Replace Glass Tabletop With Tile Weekend Warrior Wednesday Your Modern Family

Diy Replace Glass Tabletop With Tile Weekend Warrior Wednesday Your Modern Family Outdoor Table Tops Patio Top Redo

Tile Top Patio Table Makeover Chica And Jo

Tile Top Patio Table Makeover Chica And Jo

Tile Top Patio Table Makeover Chica And Jo

Tile Top Patio Table Makeover Chica And Jo

Blog Best Tips To Replace A Patio Table Top With Tile Tiay Com