How To Remove a Patio Screen Door From the Track and Frame
Removing a patio screen door from its track and frame is a relatively straightforward task that can be accomplished with basic tools and a methodical approach. Understanding the process is essential for various reasons, including maintenance, repair, replacement, and seasonal storage. This article provides a comprehensive guide to safely and effectively removing a patio screen door.
Before commencing any removal process, it is paramount to identify the type of patio screen door. The most common types include sliding screen doors, hinged screen doors, and retractable screen doors. Each type may require slightly different techniques for removal. This guide primarily focuses on sliding screen doors, as they are the most prevalent in residential settings. However, general principles can often be adapted to other screen door types.
Safety should be a primary concern throughout the removal process. It is advisable to wear work gloves to protect hands from sharp edges and potential debris. Furthermore, consider having a second person assist, especially when dealing with larger or heavier screen doors. Attempting to remove a heavy door single-handedly can lead to injury or damage to the door or surrounding structures.
Initial inspection of the screen door and its track is crucial. Look for any visible obstructions, such as dirt, debris, or damaged components, that might impede the removal process. Addressing these issues beforehand can streamline the procedure and prevent complications.
Key Point 1: Preparation and Tools Required
Proper preparation is essential for a smooth and efficient screen door removal. Gathering the necessary tools and materials beforehand minimizes interruptions and ensures the task can be completed without unnecessary delays.
The following tools are typically required:
*Screwdriver:
A Phillips head or flathead screwdriver, depending on the type of screws used in the screen door frame. *Putty Knife or Flat Pry Bar:
Used to gently pry the screen door from the track if it is stuck or requires slight pressure. *Work Gloves:
To protect hands from sharp edges and potential debris. *Cleaning Supplies:
A brush or vacuum to remove dirt and debris from the track. *Optional: WD-40 or Silicone Lubricant:
To loosen any stubborn rollers or tracks.Before you begin it is always important to have a clear space to place the door to prevent damage to the surrounding area.
Before starting, thoroughly clean the track and surrounding area. This involves removing any accumulated dirt, dust, leaves, or other debris that may be obstructing the door's movement. A vacuum cleaner with a brush attachment is effective for removing loose debris, while a damp cloth can be used to wipe down the track surfaces. This cleaning step not only facilitates the removal process but also helps to identify any potential problems, such as damaged rollers or a warped track.
If the screen door rollers appear to be stuck or difficult to move, consider applying a small amount of WD-40 or silicone lubricant to the rollers and track. This can help to loosen the rollers and make the removal process easier. Be cautious not to over-lubricate, as excessive lubricant can attract more dirt and debris over time.
Key Point 2: Removing a Sliding Patio Screen Door
The primary method for removing a sliding patio screen door involves manipulating the door's rollers and lifting it out of the track. This process typically requires a combination of lifting and tilting the door to disengage the rollers from the bottom track.
The following steps outline the removal process:
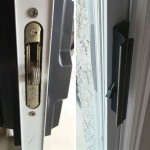
Locate the Adjustment Screws:
Most sliding screen doors have adjustment screws located at the bottom corners of the door frame. These screws control the height of the rollers and allow for adjustments to be made to ensure smooth operation. Identify these screws and determine whether they are Phillips head or flathead.Lower the Rollers:
Using the appropriate screwdriver, turn the adjustment screws counterclockwise to lower the rollers. The amount of lowering required will depend on the specific screen door model and the depth of the track. The goal is to create enough clearance for the rollers to clear the bottom track when the door is lifted. It is important to lower the rollers evenly on both sides of the door to prevent binding or uneven pressure.Lift and Tilt the Door:
Grasp the screen door frame firmly with both hands, typically at the top corners. Gently lift the door upward, while simultaneously tilting the bottom of the door slightly inward towards the interior of the house. This action should disengage the bottom rollers from the track. It may be necessary to apply a slight amount of force, but avoid using excessive force, as this could damage the door or the track.Remove the Door from the Track:
Once the bottom rollers have cleared the track, continue lifting and tilting the door until the top rollers also clear the top track. Carefully pull the door away from the frame and set it aside in a safe location. It is crucial to handle the door with care to avoid scratching the screen or damaging the frame.
If the screen door is particularly heavy or difficult to handle, it is advisable to enlist the help of a second person to assist with the lifting and removal process. This will not only make the task easier but also reduce the risk of injury or damage.
In some cases, the screen door may be equipped with a latch or locking mechanism that prevents it from being easily removed. If this is the case, disengage the latch or locking mechanism before attempting to lift and tilt the door.
Key Point 3: Handling and Storage of the Removed Screen Door
Once the screen door has been successfully removed, it is important to handle and store it properly to prevent damage and ensure its longevity. Incorrect handling or storage can lead to bent frames, torn screens, or other issues that may require costly repairs or replacements.
The following guidelines should be followed when handling and storing a removed screen door:
Handle with Care:
Avoid dropping or bumping the screen door, as this can damage the frame or screen. Always lift and carry the door with two hands, supporting it at the top and bottom corners.Clean the Door:
Before storing the screen door, thoroughly clean it to remove any dirt, dust, or debris. Use a soft brush or cloth to gently wipe down the frame and screen. For stubborn stains or dirt, a mild soap and water solution can be used. Ensure that the door is completely dry before storing it to prevent mold or mildew growth.Store in a Safe Location:
Choose a storage location that is dry, clean, and protected from the elements. An ideal storage location is a garage, shed, or basement. Avoid storing the screen door outdoors, as exposure to sunlight, rain, and extreme temperatures can damage the frame and screen.Protect from Damage:
Lean the screen door against a wall or place it on a flat surface. To prevent the screen door from being scratched or damaged, consider covering it with a sheet or blanket. Avoid placing heavy objects on top of the screen door, as this can bend the frame or damage the screen.Label the Door:
If you have multiple screen doors, label each door with its corresponding location to ensure that it is reinstalled in the correct frame. This can save time and effort during reinstallation.
By following these guidelines, the removed screen door can be stored safely and effectively, ensuring that it remains in good condition for future use.
In the event that screen door repair is the goal, the removal process allows for comprehensive access to all components. This accessibility is critical for tasks such as replacing damaged rollers, screens, or frame pieces. Thoroughly inspect the door for any signs of wear and tear or damage before commencing any repair work. Addressing these issues promptly can prevent further deterioration and extend the lifespan of the screen door.
Reinstalling the patio screen door is essentially the reverse of the removal process. Ensure the track is clean and free of obstructions. Position the door in the track, aligning the rollers with the grooves. Lift and tilt the door to engage the rollers, and then adjust the roller height using the adjustment screws until the door slides smoothly and evenly. Test the door's operation thoroughly to ensure that it opens and closes properly. If necessary, readjust the roller height or apply lubricant to improve the door's performance.

How To Remove A Sliding Screen Door 9 Steps With S

How To Remove A Sliding Screen Door 9 Steps With S

How To Fix A Sliding Screen Door Apex Window Werks

How To Put A Sliding Screen Door Back On Track Frontdoor

How To Proper Removal Replacement Of Sliding Glass Door Screen

How To Remove A Sliding Screen Door 9 Steps With S

How Can I Remove My Pella Sliding Door From The Frame Swisco Com

How To Remove And Reinstall A Screen On Vinyl Sliding Patio Door

How To Remove Sliding Glass Doors Diy Guide Action

How To Replace The Screen On A Door 11 Steps
Related Posts