How to Make a Patio on Sloped Ground
Building a patio on a slope presents unique challenges, but with careful planning and execution, it can transform an unusable area into a beautiful and functional outdoor space. This article outlines the process of constructing a patio on sloped ground, covering crucial aspects from site preparation to finishing touches.
Assessing the Slope and Choosing a Patio Type
The first step is to assess the severity of the slope. A gentle slope might accommodate a simple patio design with minimal grading, while a steeper slope will require more extensive earthmoving or retaining walls. Based on the slope, consider these patio types:
- Ground-level patio with stepped sections: Ideal for moderate slopes. The patio is built in stepped levels, following the natural contours of the land.
- Raised patio with retaining wall(s): Suitable for steeper slopes. A retaining wall creates a level area for the patio, holding back the soil on the upslope side.
- Multi-level patio: Combines elements of both stepped and raised patios, creating distinct levels connected by steps or ramps.
Planning and Design
Careful planning is essential for a successful sloped patio project. Consider these design elements:
- Drainage: Proper drainage is crucial to prevent water accumulation and damage to the patio. Plan for surface drainage away from the house and incorporate drainage solutions like French drains or dry wells if necessary.
- Accessibility: Ensure the patio is accessible from the house and other areas of the yard. Incorporate steps, ramps, or pathways as needed.
- Materials: Choose materials that complement the house and landscape. Consider durability, cost, and maintenance requirements.
- Permits and Building Codes: Check local building codes and obtain necessary permits before starting construction. Retaining walls over a certain height often require professional engineering and permits.
Site Preparation and Excavation
Once the design is finalized, site preparation begins:
- Clearing and Marking: Clear the area of vegetation, rocks, and debris. Mark the patio outline and any retaining wall locations.
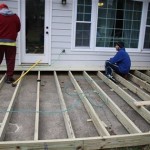
- Excavation: Excavate the area to the desired depth, taking into account the base material and paving material thickness. For stepped patios, excavate each level accordingly.
- Compaction: Compact the excavated soil thoroughly to create a stable base for the patio.
Building Retaining Walls (if applicable)
If the patio design incorporates retaining walls, their construction is a critical step:
- Foundation: Build a solid foundation for the retaining wall, extending below the frost line to prevent heaving.
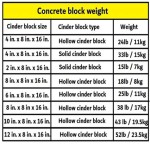
- Wall Construction: Construct the retaining wall using appropriate materials like concrete blocks, treated lumber, or natural stone. Ensure proper drainage behind the wall using gravel backfill and weep holes.
- Backfilling: Backfill behind the retaining wall with compacted gravel and soil, leaving space for topsoil and landscaping.
Base Material and Compaction
A stable base is crucial for a long-lasting patio:
- Gravel Base: Add a layer of gravel to the excavated area, typically 4-6 inches thick. This provides drainage and a level surface for the paving material.
- Compaction: Compact the gravel base thoroughly using a hand tamper or plate compactor.
- Sand Layer (optional): A layer of sand can be added on top of the gravel for paver patios, providing a bedding layer for the pavers.
Laying the Patio Material
With the base prepared, the patio material can be installed:
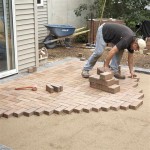
- Pavers: Lay pavers in the desired pattern, ensuring they are level and tightly fitted. Fill joints with sand or polymeric sand.
- Concrete Slab: Pour concrete into forms, ensuring proper thickness and reinforcement. Finish the surface to the desired texture.
- Natural Stone: Set natural stone pieces according to the design, using mortar or a dry-laid method. Fill gaps with mortar or gravel.
Finishing Touches
The final steps involve adding finishing touches to complete the patio:
- Edging: Install edging around the perimeter of the patio to contain the paving material and create a clean, finished look.
- Landscaping: Add plants, lighting, and other landscaping elements to enhance the patio and integrate it into the surrounding environment.
- Sealing (optional): Seal pavers or natural stone to protect them from staining and weathering.
Building a patio on sloped ground requires more planning and effort than building on a flat surface, but the result—a beautiful and usable outdoor space—is well worth the investment.

Block Patio Slope Question Doityourself Com Community Forums

Diy Patio Installation How To Build A Paver Scrappy Geek

Can You Build A Patio On Sloped Yard Lawn Landscape

How Do I Slope A Patio Toward One Of Its Corners Home Improvement Stack Exchange

Part 1 How To Build A Paver Patio On Slope And Prevent Soil Erosion

Block Patio Slope Question Doityourself Com Community Forums Sloped Backyard Landscaping Building A

How To Cope With A Sloping Garden Alda Landscapes

How To Build A Raised Patio With Retaining Wall Blocks

Diy Raised Patio Part 1 3 Introduction Preparation Footings

How To Build A Raised Patio With Retaining Wall Blocks
Related Posts