How to Do a Cement Patio
Adding a concrete patio to your home can enhance its aesthetic appeal and functionality. It offers a durable and versatile surface ideal for outdoor gatherings, dining, and relaxing. This article provides a comprehensive guide to constructing a concrete patio, covering essential steps from preparation to finishing.
1. Planning and Preparation
Before starting the construction process, careful planning and preparation are crucial. This ensures smooth execution and a high-quality outcome.
Determine the Patio’s Size and Shape: Consider the available space, intended use, and surrounding landscape. Draw a plan to scale, indicating dimensions, shape, and any desired features like benches or fire pits.
Obtain Required Permits: Contact your local building department to determine if permits are necessary for constructing a concrete patio. Secure the necessary permissions before proceeding to avoid potential legal issues.
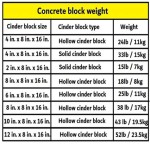
Choose Concrete Mix: Concrete is typically rated by its compressive strength, measured in pounds per square inch (psi). Select a mix appropriate for the anticipated load and usage. For residential patios, a 3,000-psi mix is generally suitable.
Gather Tools and Materials: Ensure you have the necessary tools, including measuring tape, shovels, wheelbarrow, tamper, screed board, trowel, edger, and concrete mixer. Gather materials like gravel, sand, concrete mix, and any desired decorative elements.
2. Site Preparation
A well-prepared site is vital for a stable and long-lasting concrete patio. Follow these steps:
Mark the Patio Area: Use stakes and string to mark the perimeter of the patio according to your plan. Ensure the area is level and free of obstructions.
Excavate and Compact Subgrade: Remove existing vegetation and topsoil within the marked area. Excavate to a depth of about 6 inches to accommodate the gravel base and concrete slab. Compact the subgrade using a tamper to create a solid foundation.
Install Gravel Base: Spread a 4-inch layer of compacted gravel within the marked area. This layer provides drainage and prevents the concrete from settling. Compact the gravel thoroughly for optimal support.
Install Forms: Construct wooden forms around the perimeter of the patio to contain the concrete. Make sure the forms are level and plumb, using shims if necessary. Secure the forms with stakes and braces to prevent them from moving during pouring.
3. Pouring and Finishing Concrete
Pouring and finishing the concrete require precision and attention to detail. Follow these instructions:
Mix Concrete: Follow the manufacturer’s instructions for mixing the concrete. Use a concrete mixer to achieve a consistent and workable mix. Add water gradually to achieve the desired consistency.
Pour Concrete: Pour the concrete into the forms, working systematically to ensure even distribution. Use a shovel or trowel to level the concrete and remove air pockets.
Screed the Surface: Use a screed board to level and smooth the concrete surface. Move the screed board back and forth across the form, ensuring a level and consistent finish.
Float the Concrete: Once the concrete has partially hardened, use a float to smooth and compact the surface. This helps remove air pockets and create a uniform finish.
Trowel the Surface: After floating, use a trowel to achieve the desired surface texture. For a smooth finish, use a steel trowel. For a textured finish, use a broom or a special trowel.
Create Edging: Use an edger to create sharp, defined edges around the patio. This adds a polished look and prevents chipping.
4. Curing and Maintenance
Curing is crucial for the concrete to reach its full strength and durability. Follow these steps:
Cover the Concrete: After finishing, cover the concrete with a plastic sheet or curing compound to prevent rapid drying and cracking. Keep the concrete moist for at least 7 days.
Remove Forms: Once the concrete has cured sufficiently, remove the forms carefully to avoid damaging the edges.
Seal the Patio: Apply a sealer to protect the concrete from stains, weathering, and wear and tear. Sealers enhance the appearance and extend the lifespan of the patio.

Diy Concrete Patio In 8 Easy Steps How To Pour A Cement Slab

Pouring Concrete Patio What Could Go Wrong With Doing It Yourself

How To Pour A Concrete Slab For Beginners Diy

Quikrete Building A Concrete Patio

How To Pour Concrete For A Diy Patio Next Modular

Resurfacing A Concrete Patio For Budget Diy Makeover Fab Everyday

How To Do It Yourself Easy 7 Step Concrete Patio Santa Fe

Diy Concrete Patio In 8 Easy Steps How To Pour A Cement Slab

Tips For Pouring A Concrete Patio Fine Homebuilding

Concrete Patio Ideas For Creating Your Dream Backyard Network