How to Build a Pitched Roof Patio Cover
Building a pitched roof patio cover is a great way to add shade and protection from the elements to your outdoor living space. It's a relatively simple project that can be completed in a few weekends with the right tools and materials. Here are the essential steps:
Plan and Design
The first step is to plan and design your patio cover. Determine the size of the area you want to cover and the pitch of the roof. The pitch is the angle of the roof, and it will affect the amount of sunlight and rain that the cover provides. A steeper pitch will provide more sunlight and less rain protection, while a shallower pitch will provide more rain protection and less sunlight.
Gather Materials
Once you have a plan, you need to gather the materials. You will need:
- Pressure-treated lumber for the frame
- Roofing material (such as shingles or metal)
- Flashing
- Gutters and downspouts
- Hardware (such as nails, screws, and bolts)
Build the Frame
The next step is to build the frame. Start by laying out the pressure-treated lumber on the ground and assembling it into a rectangle. The length of the rectangle will be the width of your patio cover, and the width will be the depth. Once the rectangle is assembled, you need to add support beams to the frame. The support beams should be spaced evenly apart and should run perpendicular to the length of the frame.
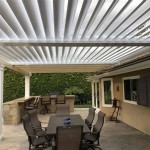
Install the Roofing
Once the frame is built, you need to install the roofing. Start by installing flashing around the perimeter of the frame. The flashing will help to prevent water from leaking into the patio cover. Once the flashing is installed, you can install the roofing material. There are a variety of roofing materials available, so choose one that is appropriate for your climate and budget.
Install the Gutters and Downspouts
Gutters and downspouts are important for directing water away from your patio cover. Install the gutters around the perimeter of the roof and connect them to the downspouts. The downspouts should be directed away from the patio cover and into a drain or storm sewer.
Finishing Touches
Once the roofing and gutters are installed, you can add finishing touches to your patio cover. This could include painting or staining the frame, adding trim, or installing lighting. You can also add screens or curtains to the sides of the patio cover to provide additional protection from the sun and wind.

18x18 Shelter Gable Roof Plans Myoutdoorplans

Patio Cover Plans Build Your Or Deck

Patio Cover Plans Build Your Or Deck

Patio Cover Plans Wood S Creative Builders

Build Gable Roof Over Deck Porch

Patio Cover Plans Wood S Creative Builders

Building A Patio Cover Plans For An Almost Free Standing Roof

Attaching Open Gable Roof To House In Timber Framing Log Construction

Building A Patio Step By Diy

Front Porch Roof Addition Building A House Exterior