How to Install a Pella Sliding Glass Patio Door
Installing a Pella sliding glass patio door can significantly enhance a home's aesthetic appeal, improve energy efficiency, and provide easy access to outdoor spaces. While professional installation is often recommended, a homeowner with sufficient experience in carpentry and construction can successfully complete the project. This article provides a detailed guide to the installation process, outlining the necessary steps, tools, and considerations for a proper and secure installation of a Pella sliding glass patio door.
Before commencing the installation, it is imperative to thoroughly review the manufacturer's instructions specifically provided with the Pella door unit. These instructions offer product-specific guidelines and may supersede general advice. Failing to adhere to the manufacturer's recommendations can void the warranty and compromise the door's performance. This guide serves as a general reference and should be used in conjunction with the official Pella installation manual.
The initial stage involves carefully inspecting the new Pella sliding glass patio door upon delivery. Inspect for any signs of damage incurred during transit. Scratches, dents, or cracks in the glass or frame should be documented and reported to the supplier immediately. Verify that all components listed on the packing slip are present, including the door panels, frame, hardware (handles, locks, rollers), and any weatherstripping or shims included in the package.
The next crucial step is preparing the opening. This encompasses removing the existing door or window, ensuring the opening is plumb, square, and level, and making any necessary structural modifications. Accurate measurements are essential. Discrepancies in the opening can lead to installation difficulties, performance issues, and potential structural problems. It is also critical to verify that electrical and plumbing lines are not present in the opening before proceeding.
Key Point 1: Preparing the Opening
Proper preparation of the opening is arguably the most critical aspect of installing a Pella sliding glass patio door. A poorly prepared opening can result in a host of problems, including difficulty operating the door, air and water leaks, and even structural damage to the door or the surrounding wall. The following steps outline the necessary procedures for preparing the opening.
First, remove the existing door or window and its frame. This typically involves removing interior and exterior trim, disconnecting any hardware, and carefully extracting the old unit. Use a reciprocating saw or pry bar to help loosen the frame if needed. Exercise caution to avoid damaging the surrounding wall.
Once the old unit is removed, thoroughly clean the opening. Remove any remaining nails, screws, or debris. Inspect the rough opening for signs of rot, mold, or insect damage. Address any such issues before proceeding. Repair any damaged framing members with appropriate materials.
Next, check the opening for plumb, square, and level. Use a level, plumb bob, and framing square to verify that the opening is perfectly vertical, horizontal, and that the corners are 90 degrees. Any deviations from these measurements must be corrected. Shimming is the most common method for correcting minor imperfections. Place shims between the framing and the door frame to achieve a level and plumb installation.
If the opening is significantly out of plumb, square, or level, it may be necessary to modify the framing. This could involve adding or removing framing members to create a true and square opening. Consult with a qualified carpenter or contractor if significant modifications are required. Failure to properly prepare the opening can compromise the performance and longevity of the Pella sliding glass patio door.
Finally, apply a sealant or flashing around the interior of the rough opening. This helps to prevent air and water infiltration around the perimeter of the door frame. Follow the sealant manufacturer's instructions for proper application.
With the opening prepared, the next step is to carefully lift and position the Pella sliding glass patio door frame into the opening. Ensure the frame is oriented correctly, with the exterior side facing outward. Use shims to level and plumb the frame. Secure the frame temporarily with screws through the pre-drilled holes in the frame jambs.
Key Point 2: Installing and Securing the Door Frame
The correct installation and securement of the door frame are important for maintaining the structural integrity of the Pella sliding glass patio door. This phase ensures smooth operation, proper weather sealing, and resistance against forced entry. The following steps describe the process of installing and securing the door frame within the prepared opening.
Carefully lift the Pella sliding glass patio door frame and maneuver it into the prepared opening. Ensure that the frame is oriented correctly, with the exterior side positioned to face outwards. Take care not to damage the frame or the surrounding wall during this process. Use assistance if the frame is heavy or awkward to handle. A helper can ensure the frame stays in place as the installer makes adjustments.
Use shims to level and plumb the frame within the opening. Insert shims between the frame jambs and the rough opening framing, starting at the top and bottom corners. Use a level and plumb bob to check the alignment. Adjust the shims until the frame is perfectly level and plumb. Avoid over-shimming, as this can distort the frame and compromise its performance. Maintain consistent spacing between shims to ensure even support.
Once the frame is level and plumb, temporarily secure it in place using screws. Drive screws through the pre-drilled holes in the frame jambs and into the surrounding framing. Use the appropriate type and length of screws, as specified in the manufacturer's instructions. Do not overtighten the screws, as this can also distort the frame. The screws should be snug enough to hold the frame in place but not so tight as to cause any bending or warping.
After temporarily securing the frame, double-check the plumb, square, and level one final time. Make any necessary adjustments by adding or removing shims. Once you are satisfied that the frame is perfectly aligned, tighten the screws fully. Be careful not to strip the screw heads or overtighten them. Ensure that the screws are securely embedded in the framing and that the frame is firmly attached to the rough opening.
With the frame securely fastened, remove any excess shims that protrude beyond the frame. A utility knife or multi-tool can be used to trim the shims flush with the frame. Be careful not to damage the frame or the surrounding wall during this process. After removing the excess shims, inspect the gap between the frame and the rough opening. This gap will be filled with insulation and sealant in a later step.
Once the frame is securely installed, it's time to install the sliding door panels. Carefully lift each panel into the track, following the manufacturer's instructions for proper orientation and alignment. The panels typically rest on rollers that allow them to slide smoothly within the track. Adjust the rollers as needed to ensure smooth and effortless operation. The panel must roll easily without binding or scraping.
Key Point 3: Installing the Door Panels and Hardware
Installing the door panels and hardware is the final phase of the Pella sliding glass patio door installation process. This critical step involves fitting the panels into the track, adjusting the rollers for smooth operation, and installing all necessary hardware, such as handles, locks, and weatherstripping. Proper installation of these components ensures the door's functionality, security, and energy efficiency. The following steps outline the process of installing the door panels and hardware.
Carefully lift each door panel and insert it into the track of the installed frame. Follow the manufacturer's instructions for identifying the correct panel orientation and the appropriate track for each panel. Most sliding glass patio doors have two panels: one fixed and one sliding. The fixed panel is typically installed first, followed by the sliding panel. Ensure that the panels are aligned correctly within the track before attempting to slide them. Misalignment can cause damage to the panels or the track.
Once the panels are in the track, adjust the rollers as needed to ensure smooth and effortless operation. The rollers are typically located at the bottom of each panel and allow the panels to slide along the track. Use a screwdriver to access the roller adjustment screws, usually located on the bottom edge of the panel. Turn the adjustment screws to raise or lower the rollers, ensuring that the panel glides smoothly and without binding. Adjust the rollers until the panel operates smoothly and evenly across the entire track.
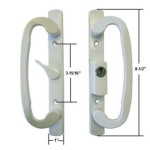
Install the hardware, including handles, locks, and weatherstripping. The exact hardware configuration will vary depending on the specific Pella sliding glass patio door model. Refer to the manufacturer's instructions for detailed guidance on installing each component. Attach the handles to the interior and exterior of the sliding panel using the provided screws. Ensure that the handles are securely fastened and that they operate smoothly. Install the lock mechanism, ensuring that it engages properly and provides a secure closure. Apply weatherstripping around the perimeter of the frame and panels to create an airtight seal. The weatherstripping helps to prevent air and water leaks, improving the door's energy efficiency and protecting against the elements.
After installing the door panels and hardware, test the operation of the door thoroughly. Open and close the sliding panel several times, ensuring that it moves smoothly and without binding. Check the lock mechanism to ensure that it engages properly and provides a secure closure. Inspect the weatherstripping to ensure that it creates a tight seal around the perimeter of the door. Make any necessary adjustments to the rollers, handles, locks, or weatherstripping to optimize the door's performance and security.
Finally, insulate the gap between the door frame and the rough opening. Use fiberglass insulation or expanding foam to fill the gap. Be careful not to overfill the gap, as this can distort the frame. After the insulation is in place, apply a bead of caulk around the perimeter of the door, both inside and out. This creates an airtight and watertight seal. Install the interior and exterior trim to conceal the gap between the door frame and the wall. The trim should be secured with nails or screws. Finally, clean the glass and frame to remove any dirt or debris. The Pella sliding glass patio door is now properly installed.
Sliding Patio Door Installation Pella

Patio Door Installation Instructions Pella

How To Install A Pella Sliding Patio Door Rolscreen

Installation Instructions Impervia Sliding Patio Door With Pella Com

How To Install A Pella Wood Clad Multi Slide Patio Door

The Step By Patio Door Replacement Process Pella

Sliding Patio Door Installation Instructions Using Frame Pella Com

Sliding Patio Door Pella Catalogs Documentation Brochures

How To Install A Pella Sliding Door Handle Set

Tips For Your Home S Patio Door Security Pella