DIY Patio Paver Walkway: A Step-by-Step Guide
Transforming your backyard into an inviting oasis begins with creating a functional and stylish walkway. A DIY patio paver walkway project is an excellent option for homeowners seeking an affordable and customizable solution. Here's a comprehensive guide to help you achieve a beautiful and durable walkway:
1. Planning and Design
Begin by determining the desired layout and size of your walkway. Consider the path's width, length, and the pattern you want to create. Sketch out a design and mark the area using stakes and string.
2. Excavation and Base Preparation
Excavate the designated area to a depth of 6-8 inches below the desired paver surface. Compact the soil using a plate compactor or hand tamper. Install a 4-6 inch layer of compacted gravel or crushed stone as a base for stability.
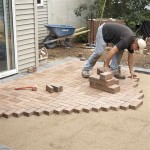
3. Laying the Pavers
Start laying the pavers from one corner, aligning them according to your design. Use a rubber mallet to gently tap the pavers into place. Maintain a consistent spacing of 1/4-1/2 inch between the pavers.
4. Cutting Pavers
For areas where you need to fit pavers, use a paver splitter or wet saw to cut them to the appropriate size. Wear safety gear while cutting.
5. Sanding the Joints
Once the pavers are in place, spread dry sand over the surface. Use a broom or leaf blower to distribute the sand evenly into the joints. Repeat the process until the joints are filled.
6. Compacting the Surface
Compact the sand-filled joints using a plate compactor or hand tamper. This step ensures the stability and longevity of your walkway.
7. Finishing Touches
To enhance the aesthetics and prevent weeds, install edging materials like plastic or concrete borders around the perimeter of the walkway. Consider adding decorative touches such as landscape lighting or planters.
Tips for a Successful Project
- Choose high-quality pavers that are designed for outdoor use.
- Use a level to ensure that the pavers are laid evenly.
- Compact the base and sand thoroughly to avoid settling and shifting.
- Seal the pavers to protect them from the elements and enhance their durability.
- Maintain your walkway regularly by sweeping away debris and removing weeds.
Conclusion
Creating a DIY patio paver walkway is an achievable project that can significantly elevate your backyard's appearance and functionality. By following these steps and incorporating the tips provided, you can enjoy a beautiful and durable walkway that will enhance your outdoor living experience for years to come.
:strip_icc()/102668962-25ccbef791dd412f9aee53f99cab4e12.jpg?strip=all "How To Lay A Patterned Brick Paver Walkway For Custom Look")
How To Lay A Patterned Brick Paver Walkway For Custom Look

How To Lay A Paver Walkway With Grass In Between

How To Build A Paver Patio Young House Love

How To Install A Diy Paver Walkway Scrappy Geek

Diy How To Install A Paver Walkway For Beginners

How To Install A Diy Paver Walkway Scrappy Geek

How To Build A Paver Path The Home Depot

How To Lay A Paver Walkway With Grass In Between

Paver Path Diy Patio Pavers Backyard Walkway

Diy Concrete Pavers An Affordable Walkway Lady Lee S Home