DIY Outdoor Patio Plans
Creating a beautiful and functional outdoor patio can significantly enhance a property's living space. A well-planned patio provides a dedicated area for relaxation, entertainment, and enjoying the outdoors. This article explores various DIY outdoor patio plans, covering crucial aspects from initial planning and material selection to construction techniques for different patio types.
Planning Your Patio Project
Careful planning is paramount to a successful patio project. Begin by defining the patio's intended purpose. Will it primarily be a dining area, a lounge space, or a combination of both? Consider the number of people the patio needs to accommodate and the desired furniture layout. This will determine the appropriate size and shape of the patio.
The next step involves selecting the location. Analyze the property's topography, sun exposure, and prevailing wind direction. A south-facing patio will receive maximum sunlight, while a west-facing patio is ideal for enjoying evening sunsets. Consider the proximity to the house and existing landscaping features. Proper drainage is essential to prevent water accumulation on the patio surface. Ensure a slight slope away from the house foundation.
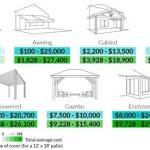
Budgeting is a crucial component of the planning phase. Research material costs, including paving materials, base materials, and any necessary tools or equipment rentals. Factor in potential labor costs if professional assistance is required for specific tasks like excavation or electrical work. Having a well-defined budget helps prevent overspending and ensures the project remains within financial constraints.
Choosing Patio Materials
The choice of patio material significantly impacts the overall aesthetic and durability of the patio. Concrete is a popular option due to its affordability, versatility, and durability. It can be poured into various shapes and sizes and can be stamped or stained to mimic more expensive materials like stone or brick. However, concrete can crack over time, especially in areas with freeze-thaw cycles.
Pavers offer a wide range of design options, coming in various shapes, sizes, colors, and materials like concrete, brick, and natural stone. They are relatively easy to install and can be replaced individually if damaged. Pavers create a permeable surface, allowing water to seep through, which can reduce runoff and improve drainage. However, they can be more expensive than poured concrete.
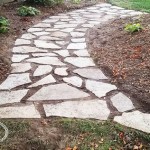
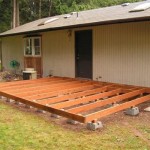
Natural stone, such as flagstone or slate, provides a classic and elegant look. It is highly durable and weather-resistant, offering a long-lasting patio surface. However, natural stone can be more expensive than other options and may require professional installation due to its weight and irregular shapes. Composite decking materials are another option, providing a wood-like appearance with increased durability and resistance to rot and insects.
Building a Concrete Patio
Constructing a concrete patio involves several key steps. First, mark the patio area and excavate the site to the desired depth, typically around 4-6 inches. Compact the soil thoroughly to create a stable base. Next, add a layer of gravel base material, typically crushed stone or gravel, and compact it again. This base layer provides drainage and prevents the concrete from cracking.
Install forms around the perimeter of the patio area to contain the concrete. These can be made of wood, metal, or plastic. Ensure the forms are level and securely anchored to prevent movement during the concrete pouring process. Pour the concrete into the forms, spreading it evenly with a rake or shovel. Use a screed board to level the concrete surface, removing excess concrete.
After the concrete has slightly hardened, use a float tool to smooth the surface and create a consistent texture. Apply a curing compound to prevent the concrete from drying too quickly, which can cause cracking. Allow the concrete to cure completely, typically for several days, before removing the forms and using the patio. The concrete can then be stained or stamped as desired.
Building a Paver Patio
Building a paver patio begins with similar site preparation as a concrete patio, including marking the area, excavating, and compacting the soil. A layer of base material, typically sand or gravel, is added and compacted to provide a level and stable foundation for the pavers. The thickness of the base layer depends on the type of pavers and the expected traffic.
Install edge restraints around the perimeter of the patio area to contain the pavers and prevent them from shifting. These can be made of plastic, metal, or concrete. Begin laying the pavers in the desired pattern, ensuring tight joints between them. Use a level to check for evenness as you progress. Once all the pavers are laid, compact them with a plate compactor to settle them into the base material.
Sweep sand into the joints between the pavers to fill the gaps and lock them in place. This also helps prevent weed growth. Repeat the sweeping and compacting process until the joints are completely filled. The final step involves applying a sealant to the pavers to protect them from staining and weathering. This sealant can enhance the color of the pavers and make them easier to clean.

Diy Outdoor Furniture Plans Patio

Top 10 Most Popular Diy Outdoor Furniture Plans The Design Confidential

Diy Patio Addition Design Able Plan Mypatiodesign Com

How To Build A Diy Covered Patio

14 Outdoor Patio Diy Ideas To Spruce Up Your Space
:strip_icc()/102019743-0101f316a6e448f39683ce54ced2f42a.jpg?strip=all "Find Inspiration For Outdoor Spaces In These 21 Diy Patio Ideas")
Find Inspiration For Outdoor Spaces In These 21 Diy Patio Ideas

31 Insanely Cool Ideas To Upgrade Your Patio This Summer Backyard Budget

Diy Outdoor Furniture 10 Easy Projects Bob Vila

58 Beautiful Outdoor Patio Design Decor Ideas A Piece Of Rainbow
:max_bytes(150000):strip_icc()/themerrythought-d31427b690464543a1dc286b32cb095d.jpg?strip=all "36 Diy Patio Ideas To Transform Your Backyard")
36 Diy Patio Ideas To Transform Your Backyard