DIY Concrete Finishes for Patios: A Comprehensive Guide
Creating a beautiful and durable concrete patio is a worthwhile investment that can enhance the curb appeal and functionality of your outdoor space. With a little bit of planning and some DIY skills, you can achieve professional-looking concrete finishes that will last for years to come. In this guide, we will explore the essential aspects of DIY concrete finishes for patios, covering the preparation, application techniques, and maintenance tips.Preparation: The Key to a Successful Finish
Thorough preparation is crucial for a successful concrete finish. Start by removing any existing concrete, soil, or debris from the patio area. Then, compact the soil firmly using a plate compactor or hand tamper. Next, install a sub-base of crushed gravel or stone to provide a stable base for the concrete. Finally, place and level a reinforcing mesh over the sub-base to prevent cracking.Concrete Mix: Choosing the Right Ingredients
The concrete mix plays a vital role in determining the strength and durability of the patio. For a typical patio, use a concrete mix with a compressive strength of at least 3,000 psi (pounds per square inch). You can purchase pre-mixed concrete or mix your own using cement, sand, gravel, and water. Follow the manufacturer's instructions carefully for mixing and placing the concrete.Application Techniques: Achieving the Desired Finish
There are various application techniques you can use to create different concrete finishes. Here are a few popular options:- Troweled Finish: Use a concrete trowel to smooth and polish the surface for a sleek and professional look.
- Broomed Finish: Brush a broom over the fresh concrete to create a textured surface that provides traction and reduces slipperiness.
- Stamped Concrete: Press decorative stamps into the concrete to create patterns and designs that resemble brick, stone, or other materials.
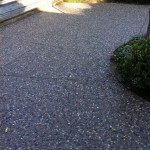
- Exposed Aggregate Finish: Remove the top layer of concrete while it's still wet to reveal the decorative aggregate underneath.
Curing and Sealing: Protecting Your Investment
Proper curing and sealing are essential for protecting your concrete patio from moisture damage and wear. Cover the concrete with plastic sheeting or burlap and keep it moist for at least seven days. This will allow the concrete to cure slowly and gain strength. Once fully cured, apply a concrete sealer to protect it from water, stains, and UV rays.Maintenance and Care: Preserving the Beauty
With proper maintenance, your concrete patio can stay in top condition for many years. Regularly sweep or hose down the patio to remove dirt and debris. Avoid using harsh chemicals or acids that can damage the concrete. If cracks or chips develop, repair them promptly using a concrete patch kit. By following these essential aspects of DIY concrete finishes for patios, you can create a beautiful and durable outdoor space that will be a source of pride and enjoyment for years to come.
How To Create Faux Tile Look On Concrete Patio Southern Hospitality

Transform Dull Concrete Into A Gorgeous Patio Intermountain Specialties

Diy Stamped Concrete Patio How To Stamp By Budget101 Com

How To Create Faux Tile Look On Concrete Patio Southern Hospitality

Stained Concrete Patios Before After

How To Make A Concrete Patio Bigger

How To Plan Pour Your Diy Concrete Patio Liberty Ready Mix

3 Concrete Resurfacing Options For Patio

Diy Concrete Patio In 8 Easy Steps How To Pour A Cement Slab

Diy Concrete Patio How To Pour A Slab Bob Vila