How to Install a Patio Screen Enclosure
Installing a patio screen enclosure significantly enhances outdoor living spaces, providing protection from insects, debris, and harsh sunlight. The installation process, while potentially manageable for experienced DIY enthusiasts, requires careful planning, accurate measurements, and adherence to local building codes. This article provides a comprehensive guide to installing a patio screen enclosure, covering essential steps from preparation to the final inspection.
Before commencing the installation, thoroughly research and understand local building regulations. Many jurisdictions require permits for structures exceeding certain dimensions or altering existing buildings. Contact the local building department to ascertain permit requirements, setback restrictions, and any specific guidelines pertaining to screen enclosure installations. Failure to comply with local regulations can result in costly fines and mandatory removal of the enclosure.
Selecting the appropriate screen enclosure kit is crucial. Consider factors such as patio dimensions, desired screen material, frame material (aluminum is a popular and durable choice), and overall aesthetic appeal. Measure the patio accurately, accounting for any existing structural elements like posts or railings. Choose a kit that accommodates these measurements and provides adequate clearance. Additionally, review customer reviews and ratings of different kits and manufacturers to ensure the selected product is of high quality and durable. It is often beneficial to consult with professionals at home improvement stores or local contractors for recommendations on the most suitable kit for specific needs and conditions.
Once the kit is selected and permits are obtained, gathering the necessary tools and materials is essential for a smooth installation process. Typical tools include a measuring tape, level, drill with various drill bits, screwdriver (both manual and power), safety glasses, work gloves, a rubber mallet, and a saw for cutting framing materials if needed. Specific tools might be recommended by the manufacturer of the kit, so it is important to carefully read instructions. Additionally, gather necessary materials such as concrete anchors, screws, shims, and sealant, if not already provided in the kit. Having all tools and materials readily available before starting the installation will save time and prevent frustrating delays.
1. Preparing the Patio Surface
Proper preparation of the patio surface is fundamental to a successful screen enclosure installation. The patio must be level, structurally sound, and free from debris. If the existing patio surface is uneven or damaged, repairs or leveling may be necessary before proceeding. Concrete patios should be thoroughly cleaned to remove dirt, oil, and other contaminants. This can be achieved using a pressure washer or scrubbing with a suitable cleaning solution. Ensure that the patio surface is completely dry before beginning the installation.
If the patio is constructed from pavers, check for any loose or uneven pavers. Replace or re-level any problematic pavers to create a stable base for the enclosure. Consider applying a sealant to the patio surface to protect it from moisture and prevent future damage. This is especially important if the patio is exposed to harsh weather conditions. Furthermore, verify that the patio slopes slightly away from the house to facilitate proper drainage and prevent water from pooling near the enclosure.
Mark the perimeter of the enclosure on the patio surface using a chalk line or similar marking tool. This provides a visual guide for aligning the frame and ensuring that the enclosure is properly positioned. Double-check the measurements to confirm that the marked perimeter corresponds accurately to the dimensions of the screen enclosure kit. Any discrepancies should be addressed before proceeding with the installation.
If the screen enclosure will be attached to an existing structure, such as the house, ensure that the attachment points are structurally sound. Inspect the walls or supports for any signs of damage or deterioration. Repair any damage before attaching the enclosure to prevent future problems. Consider using flashing to create a waterproof seal between the enclosure and the existing structure.
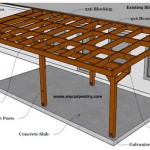
2. Assembling and Installing the Frame
The assembly of the screen enclosure frame typically involves connecting various frame components using screws, brackets, or other provided hardware. Carefully follow the manufacturer's instructions to ensure that the frame is assembled correctly. Lay out all the frame components on a flat surface and identify each piece according to the instructions. Assemble the frame in sections, starting with the base and working upwards. Use a level to ensure that each section is plumb and square before proceeding to the next.
Once the frame sections are assembled, position them on the prepared patio surface according to the marked perimeter. Secure the frame to the patio using concrete anchors or other appropriate fasteners. Ensure that the anchors are properly installed and that the frame is securely attached to the patio. Use shims to level the frame if necessary. Continuously check that all the frame components are plumb and square throughout the installation process.
If the screen enclosure includes a door, install the door frame according to the manufacturer's instructions. Ensure that the door frame is properly aligned and that the door swings freely. Install the door hardware, such as hinges and latches, according to the instructions. Adjust the door as needed to ensure that it closes securely and seals properly. Weather stripping may be used to further seal gaps in the door.
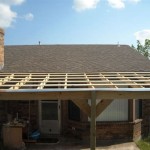
For enclosures that attach to an existing structure, carefully attach the frame to the building using appropriate fasteners. Ensure that the attachment points are secure and weatherproof. Seal any gaps between the frame and the building with sealant to prevent water intrusion. Consider using flashing to create a watertight seal between the enclosure and the existing structure. Continuously check the overall stability and proper alignment of the entire frame.
3. Installing the Screen and Finishing Touches
Installing the screen involves attaching the screen mesh to the frame using a variety of methods, such as spline rollers, clips, or staples. Stretch the screen mesh taut across the frame and secure it tightly to prevent sagging or wrinkling. Use a specialized screen roller tool to press the screen mesh into the spline channel, ensuring a secure and uniform fit. Trim any excess screen mesh with a utility knife or similar tool.
Inspect the screen for any tears, holes, or imperfections. Repair any damage using screen repair patches or by replacing the damaged section of screen mesh. Ensure that the screen is securely attached to the frame and that there are no gaps or openings that could allow insects or debris to enter the enclosure.
Once the screen is installed, apply finishing touches such as trim, molding, or sealant to enhance the appearance and weather resistance of the enclosure. Install any additional features, such as lighting, fans, or furniture, according to personal preferences. Inspect the entire enclosure for any remaining imperfections or areas that require attention.
Clean the entire enclosure thoroughly to remove any debris or residue from the installation process. Apply a protective coating to the frame to protect it from weathering and corrosion. Inspect the enclosure regularly for any signs of damage or wear and tear, and perform necessary maintenance to ensure its longevity.
The successful installation of a patio screen enclosure relies on meticulous planning, accurate execution, and strict adherence to manufacturer instructions and local building codes. Each step, from initial preparation to final finishing touches, contributes to the overall functionality, durability, and aesthetic appeal of the enclosure. Regular maintenance and inspections are essential for preserving the enclosure's integrity and ensuring long-term enjoyment of the enhanced outdoor living space.

Do It Yourself Diy Screened In Porch The Original Screen Tight System

Quality Construction For Your Pool Or Patio Screen Enclosure Installation

Screen Enclosures For Pools Patios And Rooms Tight

Checklist For Building A Screen Enclosure

How To Build A Screened In Porch On Concrete Extreme

How To Screen In A Porch Homeserve Usa

Diy Patio Screen Enclosures Or Hire A Professional Contractor

Create A Three Season Room With Diy Screened In Porch

Create A Three Season Room With Diy Screened In Porch

Do It Yourself Diy Screened In Porch The Original Screen Tight System