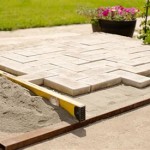
How to Lay a Brick Patio Over Concrete
A brick patio can add a touch of classic elegance and durability to your outdoor space. While laying bricks directly on the ground is the traditional method, laying them over concrete can provide a more level and stable platform, even in areas with challenging soil conditions. This article will guide you through the process of laying a brick patio over concrete, providing step-by-step instructions and essential tips for a successful project.
Preparing the Concrete Surface
The success of your brick patio depends on a properly prepared concrete surface. Before laying the bricks, carefully inspect the existing concrete for any imperfections or issues that may affect the final outcome.
Cleaning the Concrete: Begin by removing all debris, dirt, and loose material from the concrete surface. A stiff broom or pressure washer can be used for a thorough cleaning. If moss or algae are present, use a concrete cleaning solution designed for outdoor applications.
Repairing Cracks and Unevenness: Assess the concrete for any cracks or unevenness. Small cracks can be filled with patching compound, while larger cracks may require a more extensive repair using epoxy or concrete filler. For unevenness, consider grinding down high spots or adding a leveling layer of mortar.
Applying a Bonding Agent: After cleaning and repairing the concrete, apply a bonding agent. This creates a strong bond between the concrete and the mortar, preventing the bricks from shifting or moving over time. Follow the manufacturer's instructions for the application process, typically involving a thin and even coat of bonding agent.
Planning the Brick Layout
Before laying bricks, it's crucial to plan the brick layout. This involves determining the overall size and shape of the patio, as well as the pattern in which the bricks will be arranged.
Measuring and Marking: Measure the area where the patio will be installed and determine the dimensions. Use string and stakes to outline the perimeter of the patio. Consider the size and shape of the bricks and create a visual representation of the layout on paper or using a drawing app.
Choosing a Brick Pattern: There are numerous brick patterns available, each offering a unique aesthetic. Common patterns include running bond, herringbone, and basket weave. Consider the overall design of your outdoor space and choose a pattern that complements the existing landscape.
Setting the First Layer: Start by setting the first layer of bricks based on the chosen pattern. It's important to maintain consistency throughout the installation and ensure square corners. Use a level to ensure every brick is level and flush with the others.
Laying the Bricks and Mortar
Once the planning and preparation are complete, you can move on to laying the bricks. This involves spreading mortar, setting the bricks, and ensuring proper alignment and leveling.
Mixing Mortar: Use a mortar mix specifically designed for outdoor patio applications. Follow the manufacturer's instructions for mixing the mortar to achieve the correct consistency. The mortar should be thick enough to hold the bricks in place but not too thick that it makes leveling difficult.
Setting the Bricks: Spread a thin layer of mortar on the concrete surface, following the planned layout. Using a trowel, create a bed of mortar for each brick. Carefully place the bricks onto the mortar bed, ensuring they are level and aligned with the pattern.
Tapping and Leveling: Use a rubber mallet to gently tap the bricks into place. This helps compact the mortar underneath and ensures a level surface. Check the level of each brick using a level tool and adjust as needed.
Joint Spacing: Maintain consistent spacing between the bricks, often referred to as "joints." Use spacers or a tool to ensure uniform spacing throughout the patio. These spacers should be removed once the mortar has set.
Grouting and Finishing Touches
After the mortar has set, you can proceed with grouting, which fills the spaces between the bricks and enhances the appearance of the patio.
Grouting the Joints: Choose a grout color that complements the bricks and the overall design. Apply the grout using a grout bag or a rubber float. Fill each joint completely, ensuring a smooth and even application. Remove excess grout with a damp sponge.
Cleaning and Sealing: Once the grout has dried, clean the patio thoroughly to remove any remaining residue. Apply a sealant to protect the bricks and the grout from stains and weathering. Choose a sealant specifically designed for brick patios and follow the manufacturer's recommendations for application.
Creating a Border: For a more finished appearance, consider adding a border around the patio. This can be achieved using pavers, bricks, or a combination of materials. The border adds structure and definition to the patio area, creating a visually appealing separation from the surrounding landscape.
Laying a brick patio over concrete requires a combination of careful planning, meticulous attention to detail, and basic construction skills. By following these steps and taking your time, you can successfully create an attractive and durable patio that will enhance your outdoor living space for years to come.

How To Cover A Concrete Patio With Pavers Diy Family Handyman

How To Install Patio Pavers Over An Existing Concrete Slab

How To Install Patio Pavers Over An Existing Concrete Slab

Installing Brick Pavers Over Existing Cement Sidewalk

How To Install Patio Pavers Over An Existing Concrete Slab

How To Install Thin Brick Over A Concrete Slab Royal

How To Cover A Concrete Patio With Pavers Diy Family Handyman

How To Install Patio Pavers Over An Existing Concrete Slab

Pros And Cons Of Putting Pavers Over Concrete

Why Installing Pavers Over Concrete Is A Bad Idea Pavertime
Related Posts


