How To Build A Cantilever Patio Cover
A cantilever patio cover provides shade and shelter from the elements without the need for supporting posts in the middle of the patio. This open design maximizes the usable space while adding a modern and sleek aesthetic. Building a cantilever patio cover requires careful planning, accurate measurements, and a good understanding of structural engineering principles. This article will guide you through the process, outlining the essential steps and considerations for successful construction.
Understanding the Structure
The foundation of a cantilever patio cover lies in its unique structural design. The roof, usually made from lightweight materials like aluminum or polycarbonate, extends beyond the supporting pillars or beams. The weight of the roof is transferred to the supporting structure through a system of beams, brackets, and anchors. These components work together to create a strong and stable platform that can withstand various weather conditions.
The cantilever effect relies on the principle of leverage. The extended portion of the roof acts as a lever, applying downward force on the supporting structure. To counterbalance this force, the supporting beams and pillars must be adequately sized and anchored securely to the foundation. This ensures the structure remains stable and safe despite the overhang. The cantilever design offers flexibility in terms of size and shape, allowing for customization to suit different patio configurations.
Planning Your Cantilever Patio Cover
Before embarking on construction, careful planning is essential. The first step is to determine the desired size and shape of the patio cover. Consider the dimensions of your patio, the amount of shade required, and the overall aesthetic you are aiming for.
Next, choose the materials for your cantilever patio cover. Popular options include:
- Aluminum: Lightweight, durable, and corrosion-resistant, making it a popular choice for framing and roof panels. Aluminum can be powder-coated in various colors to match your existing décor.
- Steel: Offers exceptional strength but can be heavier than aluminum. Steel framing is often used for larger and more robust cantilever covers.
- Polycarbonate: A translucent roofing material that allows some light to pass through while providing excellent protection from rain and UV rays.
- Wood: Traditionally used for patio covers, wood offers a natural aesthetic and can be customized with different finishes. However, it requires regular maintenance to prevent rot and weathering.
Once you have determined the size, shape, and materials, consider the following factors:
- Building codes: Consult local building codes and regulations to ensure your cantilever patio cover complies with safety standards and permits.
- Footprint: The area covered by the supporting pillars should be adequately sized to handle the weight of the roof and any additional loads.
- Drainage: Ensure proper drainage to prevent water buildup on the roof and potential structural issues.
- Wind loads: Determine the anticipated wind loads in your area and design the structure accordingly to withstand strong winds.
Step-by-Step Construction Process
The construction process involves a series of steps that require careful attention to detail and precise measurements. This is a general overview of the process, and it is always recommended to consult with a professional builder if you are not familiar with construction practices.
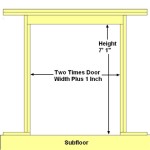
1. Foundation Preparation: Begin by preparing the foundation for the supporting pillars. This may involve pouring concrete footings, installing concrete piers, or securing the beams to an existing structure. The foundation must be strong enough to support the weight of the cantilever cover.
2. Framing: Build the framing for the patio cover using the chosen material, whether it be aluminum, steel, or wood beams. The framing should be strong enough to support the weight of the roof and provide adequate support for the cantilevered portion.
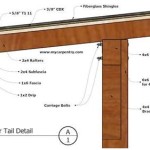
3. Installing Brackets and Anchors: Install brackets and anchors to provide the necessary support for the cantilevered portion of the roof. The brackets should be strong enough to handle the downward force exerted by the extended roof.
4. Installing the Roof: Install the roofing panels, ensuring they are securely attached to the framing and brackets. If using polycarbonate panels, consider using a thermal break to mitigate heat transfer.
5. Finishing Touches: Add any finishing touches, such as gutters, downspouts, and lighting. Ensure all connections are secure and watertight.
Building a cantilever patio cover can be a challenging project, but with careful planning, accurate measurements, and adherence to building codes, you can achieve a beautiful and functional addition to your home. Remember to consult with professional builders if you are unfamiliar with construction practices, and prioritize safety throughout the entire process.

How To Make A Two Post Patio Cover Cantilevered Design

4k Cantilevered Pergolas Patio Covered

Diy 2 Post Cantilevered Pergola Free Garden Plans How To Build Projects Outdoor

Cantilevered Pergola Diy Designed And Built Hometalk

Your Guide To Easy Build Heavy Duty Cantilever Pergolas Pavilions Trellises Western Timber Frame

Cantilevered Pergola Diy Kismet House

Cantilevered Pergola Diy Designed And Built Outdoor Plans

4k Cantilevered Pergolas Patio Covered

Here S The Cantilevered Ish Pergola We Ended Up Building Outdoor Designs

Cantilevered Pergola Diy Designed And Built Hometalk
Related Posts