How To Build A Covered Patio On a Concrete Slab
Constructing a covered patio on an existing concrete slab can significantly enhance outdoor living space, providing shelter from sun and rain. This project, while demanding, is achievable for experienced DIY enthusiasts and offers considerable cost savings compared to hiring professional contractors. It requires careful planning, adherence to local building codes, and precise execution. This article outlines the critical steps involved in building a covered patio on a concrete slab, covering everything from initial planning to final touches.
Planning and Preparation
Before commencing any physical construction, thorough planning is paramount. This phase encompasses assessing the existing concrete slab, obtaining necessary permits, designing the structure, and procuring materials.
The first step is to evaluate the existing concrete slab. The slab's structural integrity is crucial for supporting the patio cover. Inspect the slab for cracks, settling, or any signs of damage. Minor cracks can often be repaired, but significant damage might necessitate professional assessment or even slab replacement. The slab should be at least 4 inches thick to adequately support the posts and the roof structure. Its dimensions will dictate the maximum size of the covered patio. Verify the slab is level. Minor imperfections can be addressed during the post installation phase, but significant discrepancies require addressing before construction commences.
Next, research and obtain the necessary building permits. Building codes vary significantly by location, so contacting the local building department is essential. They will provide information on required setbacks, height restrictions, structural requirements, and any other regulations governing the project. Permit applications typically require detailed drawings of the proposed structure, including dimensions, materials, and construction methods. Failure to obtain the necessary permits can result in fines, project delays, and potentially even demolition orders.
Design the patio cover structure. Determine the desired size, shape, and style of the covered patio. Consider factors such as the angle of the sun, prevailing winds, and the overall aesthetic of the property. Common patio cover designs include simple gable roofs, shed roofs, and flat roofs. A detailed plan should include the dimensions of the posts, beams, rafters, and roofing materials. Choose materials that are durable, weather-resistant, and aesthetically pleasing. Pressure-treated lumber is typically recommended for the posts and framing due to its resistance to rot and insects. Consider using composite decking for a low-maintenance ceiling option. For roofing materials, options include asphalt shingles, metal roofing, and polycarbonate panels. Each material has its own advantages and disadvantages in terms of cost, durability, and aesthetics.
Procure all necessary materials and tools. Create a detailed materials list based on the design plans. Accurate measurements and calculations will minimize waste and ensure that all necessary components are available. Essential tools include a circular saw, miter saw, drill, impact driver, level, tape measure, post-hole digger (if setting posts in the ground), concrete anchors, and safety equipment. Renting larger equipment, such as a concrete saw or a scaffolding, might be necessary depending on the project scope.
Post Installation and Framing
With the planning phase complete, the focus shifts to the physical construction, beginning with post installation and framing.
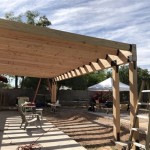
Install the support posts. The posts provide the primary vertical support for the patio cover. Determine the precise locations for the posts based on the design plans. If the concrete slab is level and in good condition, surface mounting the posts using heavy-duty concrete anchors is a viable option. Specialized concrete anchors designed for structural applications are essential. Drill pilot holes into the concrete slab according to the anchor manufacturer's instructions. Ensure the posts are plumb and square before tightening the anchors. For additional stability, consider using post bases that are specifically designed to resist uplift forces. If the concrete slab is not suitable for direct anchoring, consider cutting out sections of the slab and setting the posts in the ground with concrete footings. This method requires excavating holes below the frost line to prevent heaving during freezing temperatures. Pour concrete around the posts to create a solid footing.
Assemble the support beams. The beams run horizontally across the tops of the posts and provide support for the rafters. Cut the beams to the appropriate length based on the design plans. Attach the beams to the posts using galvanized lag screws or bolts. Ensure the beams are level and securely fastened to the posts. For longer spans, consider using laminated veneer lumber (LVL) beams, which offer increased strength and stability. When connecting multiple beam sections, stagger the joints and reinforce them with metal connecting plates.
Install the rafters. The rafters extend from the beams to the opposite side of the patio cover, providing support for the roofing material. The spacing between the rafters depends on the type of roofing material used and local building codes. Typically, rafters are spaced 16 inches or 24 inches on center. Cut the rafters to the appropriate length and angle based on the roof pitch. Attach the rafters to the beams using galvanized nails or screws. Ensure the rafters are straight and evenly spaced. For added stability, consider installing rafter ties or hurricane straps to connect the rafters to the beams and posts.
Add the roof sheathing. The roof sheathing provides a solid surface for attaching the roofing material. Typically, plywood or oriented strand board (OSB) is used for roof sheathing. Cut the sheathing to the appropriate size and attach it to the rafters using nails or screws. Ensure the sheathing is properly spaced to allow for expansion and contraction.
Roofing and Finishing Touches
The final stage involves installing the roofing material and adding any finishing touches to enhance the appearance and functionality of the covered patio.
Install the roofing material. The choice of roofing material will influence the installation method. For asphalt shingles, begin by installing an underlayment of roofing felt to protect the sheathing from moisture. Overlap the underlayment according to the manufacturer's instructions. Install the shingles starting at the bottom edge of the roof and working upwards. Overlap the shingles according to the manufacturer's instructions. For metal roofing, follow the manufacturer's instructions for installing the panels. Ensure the panels are properly sealed to prevent leaks. For polycarbonate panels, use appropriate fasteners and sealing strips to secure the panels to the rafters. Proper ventilation is crucial for preventing condensation build-up under the roofing material. Install ridge vents or soffit vents to allow for air circulation.
Install gutters and downspouts. Gutters and downspouts are essential for diverting rainwater away from the patio and the foundation of the house. Install the gutters along the edge of the roof, ensuring they are properly sloped towards the downspouts. Secure the gutters to the rafters using gutter hangers. Install the downspouts to direct the water away from the patio and the foundation. Consider connecting the downspouts to a drainage system to further manage rainwater runoff.
Add finishing touches. Once the structural components and roofing are complete, the finishing touches can enhance the aesthetic appeal and functionality of the covered patio. Consider adding a ceiling to the underside of the rafters. Options include tongue-and-groove lumber, composite decking, or drywall. Install lighting fixtures to illuminate the patio area at night. Options include recessed lighting, pendant lights, and sconces. Add electrical outlets to provide power for appliances and electronics. Consider installing a ceiling fan to improve air circulation and keep the patio cool. Apply a protective finish to the wood to protect it from the elements. Options include paint, stain, and sealant. Add landscaping around the patio to create a more inviting and relaxing atmosphere. Consider adding plants, flowers, and shrubs.
Ensuring proper drainage is essential for the longevity of the patio and the surrounding area. The ground surrounding the slab should slope away from the structure to prevent water from pooling. Additionally, proper sealing around the posts and any penetrations through the slab will help prevent water damage and maintain the structural integrity of the patio cover. Regular maintenance, such as cleaning the gutters and inspecting the roofing for damage, will help ensure the covered patio remains a functional and enjoyable outdoor space for years to come.

Diy Turning A Concrete Slab Into Covered Deck Catz In The Kitchen

Diy Turning A Concrete Slab Into Covered Deck Catz In The Kitchen

Diy Turning A Concrete Slab Into Covered Deck Catz In The Kitchen

Diy Turning A Concrete Slab Into Covered Deck Catz In The Kitchen

Diy Turning A Concrete Slab Into Covered Deck Catz In The Kitchen

Building A Patio Cover Plans For An Almost Free Standing Roof

Patio Cover Plans Build Your Or Deck

Building A Covered Patio With 30ft Span The Awesome Orange

Patio Cover Plans Build Your Or Deck

Patio Cover Plans Build Your Or Deck Roof Building A Covered
Related Posts