How To Build a Stone Wall Around a Patio
A stone wall can enhance the aesthetic appeal of your patio and provide a sense of privacy and seclusion. It can also serve a practical purpose, defining the boundaries of the patio area and creating a barrier from any unwanted elements. Building a stone wall is a rewarding project that can be tackled by DIY enthusiasts with careful planning and execution. Here's a comprehensive guide to help you build a beautiful and functional stone wall around your patio.
1. Planning and Preparation
Before you begin building, meticulous planning is crucial. Start by determining the desired height and length of the wall. Consider the style and size of your patio and the overall landscape design when choosing the height and shape of the wall. It's important to check local building codes and obtain necessary permits before construction begins.
Next, mark out the area where the wall will be constructed. Use stakes and string to create a clear outline of the wall's location. To ensure a straight and level wall, use a level and a measuring tape to mark the desired height at regular intervals along the marked line. Evaluate the soil conditions and determine if any drainage measures are required. A well-drained base is essential for the stability and longevity of the stone wall.
Finally, gather all necessary materials, including stones, mortar mix, gravel for drainage, a trowel, a mason's hammer, a spirit level, a tape measure, safety goggles, and work gloves. Choose the stones suitable for the style and purpose of the wall. Consider factors such as size, shape, and color. Ensure you have enough stones to complete the project and avoid unnecessary trips to the supplier.
2. Laying the Foundation
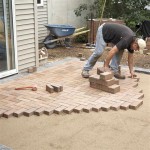
A solid foundation is fundamental to the stability and longevity of the stone wall. Dig a trench for the foundation, ensuring a depth of at least 8 inches. The trench should be wider than the base of the wall to provide adequate support. Once the trench is dug, compact the bottom layer of soil to create a stable base. Next, place a layer of gravel in the trench, about 4 inches deep. This gravel layer will act as drainage and prevent water from accumulating around the foundation.
Once the gravel layer is in place, mix the mortar according to the manufacturer's instructions. Spread a layer of mortar evenly on the gravel, creating a bed for the first row of stones. Use a trowel to ensure the mortar bed is level and firm. Begin laying the first row of stones, carefully aligning them and ensuring they are level. Use a spirit level to ensure all stones are level and flush with each other. As you lay each stone, press it firmly into the mortar bed, achieving a tight bond.
3. Constructing the Wall
After the foundation has set, you can begin building the rest of the wall. Continue to apply mortar to the top of the previous row of stones, creating a bed for the next row. Ensure the mortar is evenly spread and level. Select stones for each row, carefully considering their size, shape, and color. Work with different stone sizes to achieve a visually appealing and balanced wall.
As you lay each stone, press it firmly into the mortar bed, ensuring a tight fit. Use a mason's hammer to tap the stones into place and adjust their position if necessary. Constantly check the level of each stone and ensure they are aligned with the previous row. Maintain a gradual slope for proper drainage. It is important to work consistently and meticulously, ensuring all stones are level, aligned, and firmly embedded in the mortar.
4. Finishing Touches
Once the wall is constructed to the desired height, allow the mortar to cure completely. This curing process typically takes several days, depending on the weather conditions. Once the mortar is cured, you can apply finishing touches to enhance the appearance and functionality of the wall. You can select from various options such as capping stones, decorative edging, or plants.
Capping stones are placed on the top of the wall to protect the mortar from the elements and create a finished look. Decorative edging can be used to accentuate the wall's edges and create a more refined appearance. Plants can be planted along the base of the wall to create a natural and beautiful border. Choose plants that complement the overall landscape design and thrive in the local climate.

How To Build A Patio Enclosure With Seating Walls

How To Build Strong Patio Walls

How To Build A Raised Patio With Retaining Wall Blocks

How To Build A Retaining Wall From Stone Without Mortar

Backyard Landscaping How To Build A Dry Stacked Stone Retaining Wall Buechel

Build Your Own Stone Wall Irwin

How To Build A Small Retaining Wall In Weekend

Building A Raised Patio With Retaining Wall Block Heritage

How To Build A Seating Wall Stone Walls Garden Outdoor Landscaping

How To Build A Retaining Wall Step By
Related Posts