Dive into the DIY Circular Paver Patio: A Journey of Design and Satisfaction
Embark on a fulfilling home improvement project by creating a captivating circular paver patio in your backyard. With the right planning and effort, this DIY endeavor will transform your outdoor space into an enchanting retreat. Here's a comprehensive guide to help you achieve an impeccable circular paver patio:
1. Design and Layout: The Foundation of Your Patio
Before commencing any construction, meticulously plan the design and layout of your patio. Determine the desired size and placement, ensuring harmony with the existing landscape. Sketch a detailed plan, paying attention to the location of furniture, grills, and any other outdoor elements you envision on your patio.
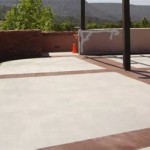
2. Site Preparation: Setting the Stage for Success
Site preparation is paramount for a stable and durable patio. Remove any existing vegetation and level the ground thoroughly. Create a solid base by compacting the soil and laying down a layer of compacted gravel or crushed stone. This base will provide support and prevent settling over time.
3. Establishing the Circular Perimeter: Defining the Shape
Employ a flexible hose or string to mark the circumference of the patio. Secure wooden stakes along the outline, ensuring a precise and cohesive circular shape. Insert paver base plates around the perimeter, ensuring they are level with one another. These plates will serve as the foundation for the pavers.
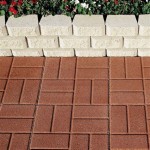
4. Laying the Pavers: A Mosaic of Your Creation
Begin laying the pavers inside the circular outline, working from the center outward. Use a rubber mallet to gently tap the pavers into place, ensuring they are level and firmly seated. Continue laying pavers in concentric circles, maintaining a consistent gap between them. Fill the joints with polymeric sand to lock them in place and prevent weeds from growing.
5. Edge Restraints: Enhancing Stability and Aesthetics
Once the pavers are laid, install edge restraints around the perimeter to secure the patio and provide a clean, finished look. There are various materials available, such as plastic edging, metal spikes, or concrete borders. Choose the option that best complements your patio design and materials.
6. Grouting and Sealing: The Finishing Touches
For added stability and durability, mix and apply grout to fill the joints between the pavers. Use a grout float to spread the grout evenly and remove any excess. Allow the grout to cure completely. Finally, apply a sealant to the pavers to protect them from the elements and enhance their longevity.
Conclusion
With meticulous planning, proper execution, and a touch of creativity, you can construct a captivating circular paver patio that will elevate your outdoor living space. Embrace this DIY project with enthusiasm, and you'll be rewarded with a stunning patio that serves as an extension of your home, inviting you to relax, entertain, and create cherished memories amidst nature's embrace.

How To Build A Round Paver Patio

How To Lay A Circular Patio Hardscape Basics Western Interlock

Inside Out How A Nationally Known Interior Stylist And Her Dedicated Diy Er Husband Took It Outside To Add Circular Patio In Their Backyard Pine Hall Brick

How To Make A Round Patio With Square Pavers Js Brick

How To Lay A Circular Patio Hardscape Basics Western Interlock

How To Lay A Circular Patio Inspiration

How To Build A Round Paver Patio

How To Lay A Circular Patio Hardscape Basics Western Interlock

How To Lay A Paving Circle Homebuilding

5 Round Patio Ideas
Related Posts