How To Remove a Screen From a Marvin Patio Door
Marvin patio doors are recognized for their quality construction and smooth operation. A key component of maintaining these doors is the seasonal removal and cleaning of the screens. Proper screen removal is essential to prevent damage to the screen itself and the door frame. This article provides a comprehensive guide on safely and effectively removing screens from various types of Marvin patio doors.
Before commencing, it is important to identify the specific type of Marvin patio door. While the underlying principle remains similar, subtle variations in screen attachment mechanisms necessitate slightly different approaches. Common Marvin patio door types include sliding patio doors and swinging patio doors, each potentially featuring different screen designs.
Identifying the Patio Door Type and Screen Attachment
The first step is to definitively determine the type of Marvin patio door. Sliding patio doors operate on a track system, with the screen usually sliding along a parallel track. Swinging patio doors, on the other hand, function like traditional hinged doors, with the screen often attached via clips or hinges.
Next, examine the screen itself to identify the attachment method. Look for visible clips, plungers, tension springs, or retainer strips that secure the screen to the door frame. Sometimes, these mechanisms may be concealed or require manipulation to be revealed. A close inspection will reveal the specific method employed.
Consulting the Marvin product documentation, if available, can provide valuable information about the screen removal process specific to the model. This documentation often includes diagrams and detailed instructions that can greatly simplify the task. If the original documentation is missing, the model number located on the door frame can be used to find product specifications online on the Marvin website.
Removing Screens from Sliding Marvin Patio Doors
Sliding patio door screens are typically held in place by a combination of top and bottom rollers or glides and a frame that fits snugly within the door track. The removal process usually involves compressing the screen to disengage it from these rollers or glides.
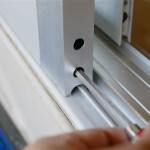
Begin by sliding the patio door screen to the center of the door opening. This provides sufficient space to maneuver the screen during removal. Carefully examine the top and bottom of the screen frame. Most sliding screen doors have spring-loaded rollers or plungers at the top or bottom that allow the screen to be compressed vertically.
Use a flathead screwdriver, or a similar tool with a thin, flat edge, to gently depress the spring-loaded plungers or rollers. While depressing the plungers or rollers, lift the screen up and out of the bottom track. This requires simultaneous action: pressing down on the plungers or rollers and lifting up on the screen. Work slowly and deliberately to avoid bending or damaging the screen frame.
Once the bottom of the screen is clear of the track, tilt the screen outwards and pull it down from the top track. It is crucial to hold the screen securely during this step to prevent it from falling and causing injury or damage. The screen should now be completely detached from the sliding patio door frame.
If the screen is difficult to remove, avoid using excessive force. Instead, re-examine the attachment mechanism and ensure that all plungers or rollers are fully depressed. It may be necessary to slightly adjust the position of the screen to relieve any binding or friction. Lubricating the track with a silicone-based lubricant can also ease the removal process.
Removing Screens from Swinging Marvin Patio Doors
Swinging patio door screens are typically attached using hinges, clips, or a combination of both. The removal process varies depending on the specific attachment method used.
If the screen is attached with hinges, the removal process is relatively straightforward. Open the screen door fully to provide ample access to the hinges. Examine the hinges for any removable pins or clips. Some hinges feature a simple pin that can be tapped out using a nail set or a similar tool. Others may have spring-loaded clips that need to be disengaged.
If removable pins are present, carefully tap them out using a nail set and hammer. Work from the bottom up, supporting the screen door to prevent it from falling once the pins are removed. Once all the pins are removed, the screen door can be lifted off the hinges.
If the hinges feature spring-loaded clips, use a flathead screwdriver to carefully disengage the clips. Gently pry the clips away from the hinge plates while simultaneously lifting the screen door. Again, support the screen door to prevent it from falling.
In some cases, swinging screen doors may be attached using clips along the perimeter of the frame. These clips typically snap into corresponding receptacles on the door frame. To remove the screen, gently pry the clips loose one at a time using a flathead screwdriver. Start at one corner and work your way around the perimeter of the screen door. Exercise caution to avoid bending or breaking the clips.
Another method of attachment involves a retainer strip that runs along the edge of the screen frame. This strip locks the screen into a groove on the door frame. To remove this type of screen, locate the end of the retainer strip and gently pry it away from the door frame. Once the end is free, carefully pull the strip out of the groove along the entire perimeter of the screen. The screen should then be easily removable.
If the screen door is equipped with a handle, it may be necessary to remove the handle to facilitate screen removal. Examine the handle for any screws or set screws that secure it to the screen frame. Remove these screws and carefully detach the handle. Remember to store the screws in a safe place to prevent them from being lost.
Handling and Storing the Screens
Once the screen is removed, it is essential to handle it carefully to prevent damage. Avoid placing the screen on rough surfaces that could scratch or tear the mesh. Store the screens in a safe and dry place, away from direct sunlight and extreme temperatures. A garage, shed, or basement are often suitable storage locations.
Before storing the screens, it is recommended to clean them thoroughly. Use a soft brush or vacuum cleaner with a brush attachment to remove any dust, dirt, or debris. For stubborn stains, use a mild soap and water solution and gently scrub the screen with a soft cloth. Rinse the screen thoroughly with clean water and allow it to air dry completely before storing.
When storing multiple screens, consider stacking them vertically with cardboard or cloth between each screen to prevent scratching. Alternatively, hang the screens from hooks or store them in a custom-built rack. Proper storage will help to prolong the life of the screens and ensure that they are in good condition when needed again.
Inspect the screen for any damage, such as tears, holes, or loose mesh, before storing. Minor repairs can often be made using a screen repair kit. However, if the damage is extensive, it may be necessary to replace the screen. Addressing any damage before storing the screens will prevent it from worsening over time.
Pay attention to the screen frame. If the frame is bent or damaged, it can make it difficult to reinstall the screen. Attempt to straighten any bent sections of the frame using pliers or a rubber mallet. If the frame is severely damaged, it may need to be replaced. Replacement frames can often be purchased from Marvin or from a local hardware store.
After the screen is removed, inspect the door frame for any damage or debris. Clean the tracks or hinges to ensure smooth operation when the screen is reinstalled. Lubricate the tracks or hinges with a silicone-based lubricant to further improve their performance. Addressing any issues with the door frame before reinstalling the screen will help to prevent future problems.
When reinstalling the screen, reverse the removal steps. Ensure that all plungers, rollers, clips, or retainer strips are properly engaged. Test the screen to ensure that it slides or swings smoothly and securely. Make any necessary adjustments to ensure proper fit and function.
Taking the time to properly remove, clean, store, and maintain the screens from Marvin patio doors will help to ensure their longevity and optimal performance. Regular maintenance will also prevent costly repairs or replacements in the future.

Removing And Adjusting The Ultimate Sliding Screen

Adjusting And Removing The Standard Sliding Screen

Adjusting And Removing The Standard Sliding Screen

How To Remove A Screen On Marvin Windows

Adjusting And Removing The Standard Sliding Screen

Adjusting And Removing The Standard Sliding Screen

Adjusting And Removing The Standard Sliding Screen

How To Adjust And Remove The Standard Sliding Screen

Adjusting And Removing The Standard Sliding Screen

How To Remove And Adjust The Ultimate Sliding Screen