How to Install a Flagstone Patio on Grass
Installing a flagstone patio directly on grass offers a cost-effective and aesthetically pleasing way to enhance outdoor living spaces. This method, while less structurally robust than a full mortar-bed installation, can provide a stable and attractive surface for patios, walkways, and garden features. This article details the process of installing a flagstone patio directly on grass, emphasizing the preparation, installation, and maintenance required for a successful outcome.
Planning and Preparation: Laying the Groundwork for Success
Before commencing any physical labor, a thorough planning phase is essential. This stage involves determining the patio's dimensions, selecting appropriate flagstone material, and gathering the necessary tools and equipment. Accurate planning minimizes material waste, reduces installation time, and contributes to the overall longevity and aesthetic appeal of the finished patio.
Determining Patio Dimensions and Layout: The first step involves defining the size and shape of the intended patio area. Consider the intended use of the space. A small patio might suffice for a bistro set, while a larger patio would be necessary for dining tables or lounge furniture. Mark the intended patio area using stakes and string, ensuring the boundaries are clearly defined. It's also crucial to consider the existing landscape features, such as trees, shrubs, and flower beds, and integrate the patio design accordingly. The layout should also consider potential traffic flow and ease of access from other areas of the yard or the house.
Selecting Flagstone Material: Flagstone is a sedimentary rock available in various colors, textures, and thicknesses. Common types include sandstone, slate, and limestone. The choice of flagstone depends on personal preference, budget, and the overall aesthetic goal. Thicker flagstones (typically 1.5 to 2 inches) are recommended for patios subjected to heavy foot traffic or furniture, as they are less prone to cracking or shifting. Consider the color and texture of the flagstone in relation to the surrounding landscape and the exterior of the house. It is advisable to purchase approximately 10% more flagstone than the estimated square footage of the patio to account for breakage and cutting waste.
Gathering Tools and Equipment: A successful flagstone patio installation requires a specific set of tools and equipment. Essential items include a shovel, a garden spade, a level (preferably a long level for accurate leveling), a rubber mallet, a hand tamper, a utility knife, measuring tape, a wheelbarrow, safety glasses, work gloves, and a broom. A circular saw with a diamond blade may be needed for cutting flagstone to fit irregular spaces. Furthermore, materials required involve landscape fabric, bedding materials (such as gravel or decomposed granite), polymeric sand.
Soil Assessment and Drainage Considerations: Before proceeding with excavation, assess the soil composition and drainage characteristics of the area. Poorly draining soil can lead to water accumulation under the patio, potentially causing instability and frost heave in colder climates. If the soil is predominantly clay or retains water, consider installing a drainage system, such as a perforated drain pipe buried beneath the patio base, to channel water away from the area. This is especially critical in areas prone to heavy rainfall or snowmelt.
Installation Process: Laying the Flagstone
The installation process involves removing the grass, preparing the base, laying the flagstone, and filling the joints. Each step needs precise execution to ensure a stable and visually appealing patio surface. Proper preparation is paramount to prevent future settling or shifting of the flagstones.
Removing the Grass and Topsoil: Using a shovel or garden spade, carefully remove the grass and a layer of topsoil from the marked patio area. Aim to remove approximately 4-6 inches of material. This excavation creates space for the bedding materials and allows the flagstone to sit flush with the surrounding ground level. Ensure the excavation is uniform in depth to prevent uneven settling. Remove any rocks, roots, or debris from the excavated area.
Preparing the Base: The base provides a stable foundation for the flagstone. Spread a layer of landscape fabric over the excavated area to prevent weed growth and soil erosion. Overlap the edges of the fabric to ensure complete coverage. Next, spread a layer of bedding material, such as gravel or decomposed granite, over the landscape fabric. A layer of 2-4 inches is typically sufficient. Use a rake or shovel to evenly distribute the bedding material, and then compact it thoroughly using a hand tamper or a plate compactor. A well-compacted base is crucial for preventing settling and maintaining a level patio surface.
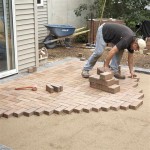
Laying the Flagstone: Begin laying the flagstone on the prepared base. Start with the largest stones first, and arrange them to minimize the need for cutting. Stagger the joints between the stones for a more natural and aesthetically pleasing appearance. Leave approximately 1-3 inches of space between each stone. Use a rubber mallet to gently tap each stone into place, ensuring it is level with the surrounding stones. A long level is essential for maintaining a consistent surface. Add or remove bedding material beneath the stones as needed to achieve a level surface. If cutting flagstone is necessary, use a circular saw with a diamond blade and appropriate safety precautions, including safety glasses and hearing protection.
Leveling and Adjustments: Throughout the laying process, frequently check the level of the flagstones. Use shims to adjust the height of individual stones as needed. Ensure each stone is stable and does not rock or wobble. Once all the flagstones are in place, make any final adjustments to ensure a consistent and level surface. This meticulous attention to detail will contribute to the overall stability and longevity of the patio.
Finishing Touches and Maintenance: Ensuring Longevity and Aesthetics
Once the flagstones are laid and leveled, the final steps involve filling the joints between the stones, compacting the area, and implementing a regular maintenance routine. These steps are critical for securing the flagstones, preventing weed growth, and preserving the aesthetic appeal of the patio.
Filling the Joints: The joints between the flagstones are typically filled with polymeric sand. This material is a mixture of sand and polymers that bind together when wetted, creating a firm and durable joint filler. Sweep the polymeric sand into the joints, ensuring they are completely filled. Use a broom to remove any excess sand from the surface of the flagstones. Follow the manufacturer's instructions for wetting the polymeric sand. Typically, a gentle spray of water is sufficient to activate the polymers. Avoid over-watering, as this can wash away the sand. The polymeric sand will harden over time, creating a stable and weed-resistant joint filler.
Compaction and Final Leveling: After filling the joints, use a hand tamper to lightly compact the entire patio surface. This helps to settle the polymeric sand and ensure a level and stable surface. Check for any uneven areas and make any necessary adjustments. Sweep the patio surface clean and allow the polymeric sand to fully cure according to the manufacturer's instructions.
Sealing (Optional): Applying a sealant to the flagstone can help protect it from staining and weathering. A penetrating sealant is recommended, as it will not alter the natural appearance of the stone. Follow the manufacturer's instructions for applying the sealant. Reapply the sealant periodically, as needed, to maintain the protective barrier.
Maintenance: Regular maintenance is essential for preserving the appearance and stability of the flagstone patio. Sweep the patio regularly to remove debris and prevent staining. Remove any weeds that may sprout in the joints. Periodically inspect the patio for any signs of settling or shifting, and make any necessary repairs. Reapply polymeric sand as needed to maintain the integrity of the joints. Avoid using harsh chemicals or abrasive cleaners on the flagstone, as these can damage the surface. A mild soap and water solution is typically sufficient for cleaning. Power washing should be done with caution, using a low-pressure setting to avoid damaging the flagstone or the joint filler.
By following these detailed steps, individuals can successfully install a flagstone patio directly on grass, creating an attractive and functional outdoor space. Careful planning, precise execution, and regular maintenance are key to ensuring the longevity and aesthetic appeal of the finished patio.

How To Lay A Flagstone Walkway In An Existing Lawn

How To Install A Flagstone Walkway True Value

How To Install A Flagstone And Gravel Patio Or Pathway

How To Build A Flagstone Patio In One Day Merrypad

Flagstone Patios How To Guide Paving Cost Diy Vs Contractor Install Mutualmaterials Com

How To Install A Dry Lay Patio Stone Depot

How To Install A Flagstone Patio Handyman Startup

How To Lay A Flagstone Walkway In An Existing Lawn

Flagstone Patio Ideas Cost How To Install Landscaping Network

Flagstone Walkway Design How To Install A
Related Posts